
Security
How to remove items from Control Pannel using Group Policy
I am showing the steps for removing control panel items using Group Policy. By doing this we can restrict others from accessing unwanted options in control panel.
Open Group Policy Editor

Go to Administrative templates under User Configuration

Open Control Panel

Open the item Hide specified Control Panel Items

By default it will not be activated. so we need to enable it, click on enabled button and click on show button for assigning the values

Here Iam removing Administrative Tools so entered the canonical name o Administrative tools and click on OK

Then click Apply – OK

At last we can see that the Administrative Tools are removed from the control panel.

Here the canonical names of every control panel items.
Action Center
- Canonical name: Microsoft.ActionCenter
- GUID: {BB64F8A7-BEE7-4E1A-AB8D-7D8273F7FDB6}
- Supported OS: Windows 7, Windows 8, Windows 8.1
- Module name: @%SystemRoot%\System32\ActionCenterCPL.dll,-1
- Pages
| Page Name | Opens |
| MaintenanceSettings | Automatic Maintenance |
| pageProblems | Problem Reports |
| pageReliabilityView | Reliability Monitor |
| pageResponseArchive | Archived Messages |
| pageSettings | Problem Reporting Settings |
Administrative Tools
- Canonical name: Microsoft.AdministrativeTools
- GUID: {D20EA4E1-3957-11d2-A40B-0C5020524153}
- Supported OS: Windows Vista, Windows 7, Windows 8, Windows 8.1
- Module name: @%SystemRoot%\system32\shell32.dll,-22982
AutoPlay
- Canonical name: Microsoft.AutoPlay
- GUID: {9C60DE1E-E5FC-40f4-A487-460851A8D915}
- Supported OS: Windows Vista, Windows 7, Windows 8, Windows 8.1
- Module name: @%SystemRoot%\System32\autoplay.dll,-1
Biometric Devices
- Canonical name: Microsoft.BiometricDevices
- GUID: {0142e4d0-fb7a-11dc-ba4a-000ffe7ab428}
- Supported OS: Windows 7, Windows 8, Windows 8.1
- Module name: @%SystemRoot%\System32\biocpl.dll,-1
BitLocker Drive Encryption
- Canonical name: Microsoft.BitLockerDriveEncryption
- GUID: {D9EF8727-CAC2-4e60-809E-86F80A666C91}
- Supported OS: Windows Vista, Windows 7, Windows 8, Windows 8.1
- Module name: @%SystemRoot%\System32\fvecpl.dll,-1
Color Management
- Canonical name: Microsoft.ColorManagement
- GUID: {B2C761C6-29BC-4f19-9251-E6195265BAF1}
- Supported OS: Windows Vista, Windows 7, Windows 8, Windows 8.1
- Module name: @%systemroot%\system32\colorcpl.exe,-6
Credential Manager
- Canonical name: Microsoft.CredentialManager
- GUID: {1206F5F1-0569-412C-8FEC-3204630DFB70}
- Supported OS: Windows 7, Windows 8, Windows 8.1
- Module name: @%SystemRoot%\system32\Vault.dll,-1
- Pages
| Page Name | Opens |
| ?SelectedVault=CredmanVault | Windows Credentials |
Date and Time
- Canonical name: Microsoft.DateAndTime
- GUID: {E2E7934B-DCE5-43C4-9576-7FE4F75E7480}
- Supported OS: Windows Vista, Windows 7, Windows 8, Windows 8.1
- Module name: @%SystemRoot%\System32\timedate.cpl,-51
- Pages
| Page Name | Opens |
| 1 | Additional Clocks |
Default Programs
- Canonical name: Microsoft.DefaultPrograms
- GUID: {17cd9488-1228-4b2f-88ce-4298e93e0966}
- Supported OS: Windows Vista, Windows 7, Windows 8, Windows 8.1
- Module name: @%SystemRoot%\System32\sud.dll,-1
- Pages
| Page Name | Opens |
| pageDefaultProgram | Set Default Programs |
| pageFileAssoc | Set Associations |
Device Manager
- Canonical name: Microsoft.DeviceManager
- GUID: {74246bfc-4c96-11d0-abef-0020af6b0b7a}
- Supported OS: Windows Vista, Windows 7, Windows 8, Windows 8.1
- Module name: @%SystemRoot%\System32\devmgr.dll,-4
Devices and Printers
- Canonical name: Microsoft.DevicesAndPrinters
- GUID: {A8A91A66-3A7D-4424-8D24-04E180695C7A}
- Supported OS: Windows 7, Windows 8, Windows 8.1
- Module name: @%systemroot%\system32\DeviceCenter.dll,-1000
Display
- Canonical name: Microsoft.Display
- GUID: {C555438B-3C23-4769-A71F-B6D3D9B6053A}
- Supported OS: Windows 7, Windows 8, Windows 8.1
- Module name: @%SystemRoot%\System32\Display.dll,-1
- Pages
| Page Name | Opens |
| Settings | Screen Resolution |
Ease of Access Center
- Canonical name: Microsoft.EaseOfAccessCenter
- GUID: {D555645E-D4F8-4c29-A827-D93C859C4F2A}
- Supported OS: Windows Vista, Windows 7, Windows 8, Windows 8.1
- Module name: @%SystemRoot%\System32\accessibilitycpl.dll,-10
- Pages
| Page Name | Opens |
| pageEasierToClick | Make the mouse easier to use |
| pageEasierToSee | Make the computer easier to see |
| pageEasierWithSounds | Use text or visual alternatives for sounds |
| pageFilterKeysSettings | Set up Filter Keys |
| pageKeyboardEasierToUse | Make the keyboard easier to use |
| pageNoMouseOrKeyboard | Use the computer without a mouse or keyboard |
| pageNoVisual | Use the computer without a display |
| pageQuestionsCognitive | Get recommendations to make your computer easier to use (cognitive) |
| pageQuestionsEyesight | Get recommendations to make your computer easier to use (eyesight) |
Family Safety
- Canonical name: Microsoft.ParentalControls
- GUID: {96AE8D84-A250-4520-95A5-A47A7E3C548B}
- Supported OS: Windows Vista, Windows 7, Windows 8, Windows 8.1
- Module name: @%SystemRoot%\System32\wpccpl.dll,-100
- Pages
| Page Name | Opens |
| pageUserHub | Choose a user and set up Family Safety |
File History
- Canonical name: Microsoft.FileHistory
- GUID: {F6B6E965-E9B2-444B-9286-10C9152EDBC5}
- Supported OS: Windows 8, Windows 8.1
- Module name: @%SystemRoot%\System32\fhcpl.dll,-52
- File History includes a newer version of the Backup and Restore item, but that older item’s canonical name does not remap to File History.
Folder Options
- Canonical name: Microsoft.FolderOptions
- GUID: {6DFD7C5C-2451-11d3-A299-00C04F8EF6AF}
- Supported OS: Windows Vista, Windows 7, Windows 8, Windows 8.1
- Module name: @%SystemRoot%\system32\shell32.dll,-22985
Fonts
- Canonical name: Microsoft.Fonts
- GUID: {93412589-74D4-4E4E-AD0E-E0CB621440FD}
- Supported OS: Windows Vista, Windows 7, Windows 8, Windows 8.1
- Module name: @%SystemRoot%\System32\FontExt.dll,-8007
HomeGroup
- Canonical name: Microsoft.HomeGroup
- GUID: {67CA7650-96E6-4FDD-BB43-A8E774F73A57}
- Supported OS: Windows 7, Windows 8, Windows 8.1
- Module name: @%SystemRoot%\System32\hgcpl.dll,-1
Indexing Options
- Canonical name: Microsoft.IndexingOptions
- GUID: {87D66A43-7B11-4A28-9811-C86EE395ACF7}
- Supported OS: Windows Vista, Windows 7, Windows 8, Windows 8.1
- Module name: @%SystemRoot%\System32\srchadmin.dll,-601
Infrared
- Canonical name: Microsoft.Infrared
- GUID: {A0275511-0E86-4ECA-97C2-ECD8F1221D08}
- Supported OS: Windows 7, Windows 8, Windows 8.1
- Module name: @%SystemRoot%\System32\irprops.cpl,-1
Internet Options
- Canonical name: Microsoft.InternetOptions
- GUID: {A3DD4F92-658A-410F-84FD-6FBBBEF2FFFE}
- Supported OS: Windows Vista, Windows 7, Windows 8, Windows 8.1
- Module name: @C:\Windows\System32\inetcpl.cpl,-4312
- Pages
| Page Name | Opens |
| 1 | Security |
| 2 | Privacy |
| 3 | Content |
| 4 | Connections |
| 5 | Programs |
| 6 | Advanced |
iSCSI Initiator
- Canonical name: Microsoft.iSCSIInitiator
- GUID: {A304259D-52B8-4526-8B1A-A1D6CECC8243}
- Supported OS: Windows Vista, Windows 7, Windows 8, Windows 8.1
- Module name: @%SystemRoot%\System32\iscsicpl.dll,-5001
iSNS Server
- Canonical name: Microsoft.iSNSServer
- GUID: {0D2A3442-5181-4E3A-9BD4-83BD10AF3D76}
- Supported OS: Windows Vista, Windows 7, Windows 8, Windows 8.1
- Module name: @%SystemRoot%\System32\isnssrv.dll,-5005
- This Control Panel item will be seen only in server versions of Windows.
Keyboard
- Canonical name: Microsoft.Keyboard
- GUID: {725BE8F7-668E-4C7B-8F90-46BDB0936430}
- Supported OS: Windows Vista, Windows 7, Windows 8, Windows 8.1
- Module name: @%SystemRoot%\System32\main.cpl,-102
Language
- Canonical name: Microsoft.Language
- GUID: {BF782CC9-5A52-4A17-806C-2A894FFEEAC5}
- Supported OS: Windows 8, Windows 8.1
- Module name: @%SystemRoot%\System32\UserLanguagesCpl.dll,-1
Location Settings
- Canonical name: Microsoft.LocationSettings
- GUID: {E9950154-C418-419e-A90A-20C5287AE24B}
- Supported OS: Windows 8, Windows 8.1
- Module name: @%SystemRoot%\System32\SensorsCpl.dll,-1
Mouse
- Canonical name: Microsoft.Mouse
- GUID: {6C8EEC18-8D75-41B2-A177-8831D59D2D50}
- Supported OS: Windows Vista, Windows 7, Windows 8, Windows 8.1
- Module name: @%SystemRoot%\System32\main.cpl,-100
- Pages
| Page Name | Opens |
| 1 | Pointers |
| 2 | Pointer Options |
| 3 | Wheel |
| 4 | Hardware |
MPIOConfiguration
- Canonical name: Microsoft.MPIOConfiguration
- GUID: {AB3BE6AA-7561-4838-AB77-ACF8427DF426}
- Supported OS: Windows 7, Windows 8, Windows 8.1
- Module name: @%SystemRoot%\System32\mpiocpl.dll,-1000
- This Control Panel item will be seen only in server versions of Windows.
Network and Sharing Center
- Canonical name: Microsoft.NetworkAndSharingCenter
- GUID: {8E908FC9-BECC-40f6-915B-F4CA0E70D03D}
- Supported OS: Windows Vista, Windows 7, Windows 8, Windows 8.1
- Module name: @%SystemRoot%\System32\netcenter.dll,-1
- Pages
| Page Name | Opens |
| Advanced | Advanced sharing settings |
| ShareMedia | Media streaming options |
Notification Area Icons
- Canonical name: Microsoft.NotificationAreaIcons
- GUID: {05d7b0f4-2121-4eff-bf6b-ed3f69b894d9}
- Supported OS: Windows 7, Windows 8, Windows 8.1
- Module name: @%SystemRoot%\System32\taskbarcpl.dll,-1
Pen and Touch
- Canonical name: Microsoft.PenAndTouch
- GUID: {F82DF8F7-8B9F-442E-A48C-818EA735FF9B}
- Supported OS: Windows 7, Windows 8, Windows 8.1
- Module name: @%SystemRoot%\System32\tabletpc.cpl,-10103
- Pages
| Page Name | Opens |
| 1 | Flicks |
| 2 | Handwriting |
Personalization
- Canonical name: Microsoft.Personalization
- GUID: {ED834ED6-4B5A-4bfe-8F11-A626DCB6A921}
- Supported OS: Windows Vista, Windows 7, Windows 8, Windows 8.1
- Module name: @%SystemRoot%\System32\themecpl.dll,-1
- Pages
| Page Name | Opens |
| pageColorization | Color and Appearance |
| pageWallpaper | Desktop Background |
Phone and Modem
- Canonical name: Microsoft.PhoneAndModem
- GUID: {40419485-C444-4567-851A-2DD7BFA1684D}
- Supported OS: Windows 7, Windows 8, Windows 8.1
- Module name: @%SystemRoot%\System32\telephon.cpl,-1
- The window that this value launches is titled “Location Information” in versions of Windows prior to Windows 8. The item’s UI is considerably changed as of Windows 8.
Power Options
- Canonical name: Microsoft.PowerOptions
- GUID: {025A5937-A6BE-4686-A844-36FE4BEC8B6D}
- Supported OS: Windows Vista, Windows 7, Windows 8, Windows 8.1
- Module name: @%SystemRoot%\System32\powercpl.dll,-1
- Pages
| Page Name | Opens |
| pageGlobalSettings | System Settings |
| pagePlanSettings | Edit Plan Settings |
Programs and Features
- Canonical name: Microsoft.ProgramsAndFeatures
- GUID: {7b81be6a-ce2b-4676-a29e-eb907a5126c5}
- Supported OS: Windows Vista, Windows 7, Windows 8, Windows 8.1
- Module name: @%systemroot%\system32\appwiz.cpl,-159
- Pages
| Page Name | Opens |
| ::{D450A8A1-9568-45C7-9C0E-B4F9FB4537BD} | Installed Updates |
Recovery
- Canonical name: Microsoft.Recovery
- GUID: {9FE63AFD-59CF-4419-9775-ABCC3849F861}
- Supported OS: Windows 7, Windows 8, Windows 8.1
- Module name: @%SystemRoot%\System32\recovery.dll,-101
Region
- Canonical name: Microsoft.RegionAndLanguage
- GUID: {62D8ED13-C9D0-4CE8-A914-47DD628FB1B0}
- Supported OS: Windows 7, Windows 8, Windows 8.1
- Module name: @%SystemRoot%\System32\intl.cpl,-1
- The Region and Language item found in Windows 7 was split as of Windows 8. Microsoft.RegionAndLanguage now launches the Region item. To launch the Language item, use Microsoft.Language.
- Pages
| Page Name | Opens |
| 1 | Location |
| 2 | Administrative |
RemoteApp and Desktop Connections
- Canonical name: Microsoft.RemoteAppAndDesktopConnections
- GUID: {241D7C96-F8BF-4F85-B01F-E2B043341A4B}
- Supported OS: Windows 7, Windows 8, Windows 8.1
- Module name: @%SystemRoot%\System32\tsworkspace.dll,-15300
Sound
- Canonical name: Microsoft.Sound
- GUID: {F2DDFC82-8F12-4CDD-B7DC-D4FE1425AA4D}
- Supported OS: Windows 7, Windows 8, Windows 8.1
- Module name: @%SystemRoot%\System32\mmsys.cpl,-300
Speech Recognition
- Canonical name: Microsoft.SpeechRecognition
- GUID: {58E3C745-D971-4081-9034-86E34B30836A}
- Supported OS: Windows 7, Windows 8, Windows 8.1
- Module name: @%SystemRoot%\System32\Speech\SpeechUX\speechuxcpl.dll,-1
Storage Spaces
- Canonical name: Microsoft.StorageSpaces
- GUID: {F942C606-0914-47AB-BE56-1321B8035096}
- Supported OS: Windows 8, Windows 8.1
- Module name: @C:\Windows\System32\SpaceControl.dll,-1
Sync Center
- Canonical name: Microsoft.SyncCenter
- GUID: {9C73F5E5-7AE7-4E32-A8E8-8D23B85255BF}
- Supported OS: Windows Vista, Windows 7, Windows 8, Windows 8.1
- Module name: @%SystemRoot%\System32\SyncCenter.dll,-3000
System
- Canonical name: Microsoft.System
- GUID: {BB06C0E4-D293-4f75-8A90-CB05B6477EEE}
- Supported OS: Windows Vista, Windows 7, Windows 8, Windows 8.1
- Module name: @%SystemRoot%\System32\systemcpl.dll,-1
Tablet PC Settings
- Canonical name: Microsoft.TabletPCSettings
- GUID: {80F3F1D5-FECA-45F3-BC32-752C152E456E}
- Supported OS: Windows Vista, Windows 7, Windows 8, Windows 8.1
- Module name: @%SystemRoot%\System32\tabletpc.cpl,-10100
Taskbar and Navigation
- Canonical name: Microsoft.Taskbar
- GUID: {0DF44EAA-FF21-4412-828E-260A8728E7F1}
- Supported OS: Windows 8, Windows 8.1
- Module name: @%SystemRoot%\system32\shell32.dll,-32517
Troubleshooting
- Canonical name: Microsoft.Troubleshooting
- GUID: {C58C4893-3BE0-4B45-ABB5-A63E4B8C8651}
- Supported OS: Windows 7, Windows 8, Windows 8.1
- Module name: @%SystemRoot%\System32\DiagCpl.dll,-1
- Pages
| Page Name | Opens |
| HistoryPage | History |
TSAppInstall
- Canonical name: Microsoft.TSAppInstall
- GUID: {BAA884F4-3432-48b8-AA72-9BF20EEF31D5}
- Supported OS: Windows 7, Windows 8, Windows 8.1
- Module name: @%systemroot%\system32\tsappinstall.exe,-2001
User Accounts
- Canonical name: Microsoft.UserAccounts
- GUID: {60632754-c523-4b62-b45c-4172da012619}
- Supported OS: Windows Vista, Windows 7, Windows 8, Windows 8.1
- Module name: @%SystemRoot%\System32\usercpl.dll,-1
Windows Anytime Upgrade
- Canonical name: Microsoft.WindowsAnytimeUpgrade
- GUID: {BE122A0E-4503-11DA-8BDE-F66BAD1E3F3A}
- Supported OS: Windows Vista, Windows 7, Windows 8, Windows 8.1
- Module name: @$(resourceString._SYS_MOD_PATH),-1
Windows Defender
- Canonical name: Microsoft.WindowsDefender
- GUID: {D8559EB9-20C0-410E-BEDA-7ED416AECC2A}
- Supported OS: Windows Vista, Windows 7, Windows 8, Windows 8.1
- Module name: @%ProgramFiles%\Windows Defender\MsMpRes.dll,-104
Windows Firewall
- Canonical name: Microsoft.WindowsFirewall
- GUID: {4026492F-2F69-46B8-B9BF-5654FC07E423}
- Supported OS: Windows Vista, Windows 7, Windows 8, Windows 8.1
- Module name: @C:\Windows\system32\FirewallControlPanel.dll,-12122
- Pages
| Page Name | Opens |
| pageConfigureApps | Allowed apps |
Windows Mobility Center
- Canonical name: Microsoft.MobilityCenter
- GUID: {5ea4f148-308c-46d7-98a9-49041b1dd468}
- Supported OS: Windows Vista, Windows 7, Windows 8, Windows 8.1
- Module name: @%SystemRoot%\system32\mblctr.exe,-1002
Windows To Go
- Canonical name: Microsoft.PortableWorkspaceCreator
- GUID: {8E0C279D-0BD1-43C3-9EBD-31C3DC5B8A77}
- Supported OS: Windows 8, Windows 8.1
- Module name: @%SystemRoot%\System32\pwcreator.exe,-151
Windows Update
- Canonical name: Microsoft.WindowsUpdate
- GUID: {36eef7db-88ad-4e81-ad49-0e313f0c35f8}
- Supported OS: Windows Vista, Windows 7, Windows 8, Windows 8.1
- Module name: @%SystemRoot%\system32\wucltux.dll,-1
- Pages
| Page Name | Opens |
| pageSettings | Change settings |
| pageUpdateHistory | View update history |
Work Folders
- Canonical name: Microsoft.WorkFolders
How to Solve error: This app can’t be activated by the Built-in Administrator in Windows 8.1
In Windows 8 and Windows 8.1, if you are using built-in Administrator account You can’t use some apps. We will get a error message that This app can’t use by built-in administrator or This app can’t be activated by the built-in administrator. Here the steps or solving this error.

Open Group Policy Editor from Run
Windows + R
gpedit.msc

From Local Group Policy Editor Navigate to

Windows Settings > Security Settings > Local Policy > Security Options

Enable the Policy User Account Control: Admin Approval Mode for the Built-in Administrator Account

Double click on the policy and Check Enabled then Apply > OK

Just Restart your PC and check. You can use the apps from Built-in Administrator account the error will not appear again.
Uses of Hosts files in Windows.
The hosts file is a computer file used by an operating system to map host names to IP addresses. The hosts file is a plain text file, and is conventionally named hosts. Is a text file in a TCP/IP network that specifies the IP addresses of computer names and domain names. It is used to convert a request by name to a numeric IP address on the local network or the Internet.
Where you can Find Hosts File.
In Windows XP, Vista, Windows 7, Windows 8 We can find Hosts file in C:\Windows\System32\Drivers\etc

Open the file with notepad


Usages of Hosts File.
1. Block a Web Site
To block a website, add a line like the following one to the bottom of the hosts file:
127.0.0.1 http://www.facebook.com

127.0.0.1 is known as Loop back IP address which is a special IP number (127.0.0.1) that is designated for the software loopback interface of a machine. The loopback interface has no hardware associated with it, and it is not physically connected to a network. While we changing the host file like here when we try to go to Facebook page it will redirect into 127.0.0.1 so we cant get that site.
2. Redirect a Web Site
You can also use this trick to redirect a website to another website. For example, lets try how to redirect facebook.com to google.com – so when we type facebook.com into our address bars,we will automatically redirect to Google.com
First we need Google’s IP Address. first open Command Prompt and enter the command Ping google.com
Here we can see that IP address of google.com is 74.125.236.165

Open your Host file and type a line as follow.
74.125.236.165 http://www.facebook.com

Here let see what happening when you try to go to facebook.com it will connects facebook.com to google’s IP so ends up with google.com
3. Create Local Domain Names
You can also create local domain names for your computers. For example, if you are a system administrator you will require to access router randomly so here I made a small change for accessing my router easily.
192.168.2.1 http://www.router.com

Now you can access your router page by entering router.com in your address bar….
4. Create Shortcut for Websites.
If you are adict to facebook you can create shortcut for facebook.com. Open Command Prompt and enter the following command; ping facebook.com

Now we can see that 173.252.110.27 is facebook’s IP Address, Changed the Host file as follows and after saving the settings you will need to type only f.com for getting facebook.com
173.252.110.27 http://www.f.com

Disable Reveal Password Button in Windows 8.
In Windows 8, you will notice a new icon when filling in your password. Its job is to let the user know if the password has been typed correctly or not. By leaving the button displayed, users leave open the possibility of revealing passwords with anybody who has access to the system.
Step 1
Open Group Policy Editior
Run > gpedit.msc >OK

Step 2
Click User Configuration > Administrative Templates

Step 3
Click Windows Components > Credential User Interface

Step 4
Open the settings “Do not display the password reveal button”
Enable the feature by checking Enabled, Click Apply > OK for saving the settings.

How to break Windows 8 login Password.

Step 1
- Download Windows Password Breaker from here.
Step 2
- Make bootable USB by using the downloaded ISO.
- https://feelsecured.wordpress.com/2013/10/28/how-to-make-a-bootable-usb/
Step 3
- Restart the system and Boot from the USB Disk.
Step 4
- Select the user name which you want to break.
- Click Reset
Step 5
- Click Yes on the confirmation dialog box.
Step 6
- Now we can see that administrator account’s password is reset.
- Click on Reboot, Remove your boot media and boot to Hard disk


How to install Back Track.
 BackTrack is intended for all audiences from the most savvy security professionals to early newcomers to the information security field. BackTrack promotes a quick and easy way to find and update the largest database of security tools collection to-date. Our community of users range from skilled penetration testers in the information security field, government entities, information technology, security enthusiasts, and individuals new to the security community.
Step 1
- Insert Back Track CD into the CD/DVD Drive and Boot from CD.
- Select BackTrack Text – Default Boot Text Mode.
- Press Enter

Step2
- Type startx and press Enter.

Step 3
- Double click on Install BackTrack.

Step 4
- Select the Language
- Click Forward.

Step 5
- Select the Location and Time zone.
- Click Forward.

Step 6
- Select the Keyboard Layout USA.
- Click Forward.

Step 7
- Select specify partitions manually
- Click Forward.

Step 8
- We can see a free space of 43 GB.
- Select the free space and click on New Partition Table.

Step 9
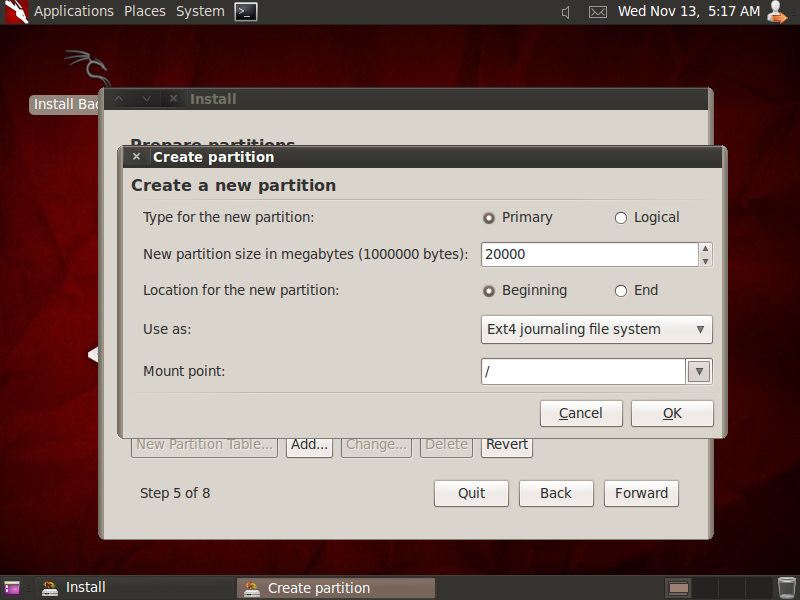
- Give the Size for Root [/] partition, here allotted 20000 MB for Root partition.
- Make sure that Use as: Ext4 Journaling File system
- Mount Point / [symbol of Root Partition]
- Click OK
Step 10
- Here we want to create the Swap Area, so select the free space and click Add

Step 11
- Created partition with 2949 MB and changed the value Use as: swap area
- Click OK

Step 12
- Now the partitioning is completed. Click Forward to continue the installation.

Step 13
- Click Install for starting the installation.

Step 14
- Installation started now…


Step 15
- Now the installation is completed click Restart Now..


Step 16
- Remove the Installation media and press enter.

Step 17
- Login as,
- User name : root
- Password : toor

- Type startx and press enter

Step 18

How can activate Gmail 2-Step Verification
 2-Step Verification is a new method of security, adds an extra layer of security to your Google Account In addition to your username and password, you’ll enter a code that Google will send you via text, voice call, or our mobile app.
- Enter your password
- Whenever you sign in to Google you’ll enter your username and password as usual.
- Enter a code from your phone
- Then, you’ll be asked for a code that will be sent to you via text, voice call, or our mobile app.
- Sign in to your Gmail Account
- Go to Account settings page by clicking on your name or picture in the upper right corner of the screen and then clicking Account.
- On the left tab, click Security and then Edit under “2-Step verification.” This will bring you to the 2-Step Verification settings page.
- You will then see a step-by-step guide which will help you through the setup process.
- Enter your Phone number and click Send Code
- Enter the Secret Code that Google send to your mobile.
- Click Verify
- Click Next
- Click on Confirm
- We enabled 2-Step Verification for your Gmail Account
- You can add Back Numbers by Clicking Add a phone number
- There are 10 Backup codes for accessing your Gmail Account if the phone is not with you so pls note that backup codes.
- After you turn on 2-step verification, non-browser applications and devices that use your Google Account (such as the Gmail app on your phone or Outlook), will be unable to connect to your account. However, in a few steps, you can generate a special password called application-specific password to allow this application to connect to your account — and don’t worry, you’ll only have to do this once for each device or application.


How to browse Anonymously…..

Tor (originally TOR, an acronym for The Onion Router) is free software for enabling online anonymity. Tor directs Internet traffic through a free, worldwide, volunteer network consisting of more than four thousand relays to conceal a user’s location or usage from anyone conducting network surveillance or traffic analysis. Using Tor makes it more difficult to trace Internet activity, including “visits to Web sites, online posts, instant messages, and other communication forms”, back to the userand is intended to protect the personal privacy of users, as well as their freedom and ability to conduct confidential business by keeping their internet activities from being monitored.
“Onion Routing“ refers to the layers of the encryption used. The original data, including its destination, are encrypted and re-encrypted multiple times, and are sent through a virtual circuit comprising successive, randomly selected Tor relays. Each relay decrypts a “layer” of encryption to reveal only the next relay in the circuit, in order to pass the remaining encrypted data on to it. The final relay decrypts the last layer of encryption and sends the original data, without revealing or even knowing its sender, to the destination. This method reduces the chance of the original data being understood in transit and, more notably, conceals the routing of it.
How it works……
 Tor aims to conceal its user’s identities and their network activity from surveillance and traffic analysis by separating identification and routing. It is an implementation of onion routing, which encrypts and then randomly bounces communications through a network of relays run by volunteers around the globe. These onion routers employ encryption in a multi-layered manner to ensure perfect forward secrecy between relays, thereby providing users with anonymity in network location. That anonymity extends to the hosting of censorship-resistant content via Tor’s anonymous hidden service feature. Furthermore, by keeping some of the entry relays (bridge relays) secret, users can evade Internet censorship that relies upon blocking public Tor relays.
How can Install….
- We can download the Tor Browser from the following link..
- https://www.torproject.org/download/download
- Copy the Downloaded files in to the Program Files and extract it.
- Open the Folder > Start Tor Browser
Now you can browse Anonymously…..
For More Details…


How can protect our PC with SAM Lock Tool.
Now a days User Account Passwords are easily breakable. There are many tools available for resetting User Account Passwords. So here we are going to lock our system with SAM Lock Tool, very difficult to break.
- Open RUN
- Windows + R
- ‘syskey’

- Click Update to set Password for our system.

- Check Password Setup
- Enter your Password and click OK

You can remove the password protection by checking the System Generated Password.
How to reset your Master Password in Mozilla Firefox.
- In the Firefox location bar, enter the following location:
chrome://pippki/content/resetpassword.xul - Press Enter.
- The “Reset Master Password” page will appear. Click the Reset button, to reset your master password.

Resetting the Master Password will remove all your saved passwords from your browser..
