
Operating System Installations
Upgrade your Windows 7 PC to Windows 8.1
Finally Windows 8.1 is released and its time for upgrading from your old operating system to Windows 8.1. Here is the steps for upgrading from Windows 7 to Windows 8.1.
Insert Windows 8.1 installation disk and open My Computer.

CD/DVD Drive > Right Click > Open Autoplay

Up gradation is started now. Check No, thanks because it require more time for installation. You have options for updating after completing upgradation.
Click Next

Agree the license terms by clicking Accept.

If you want your personal files check Keep personal files only > Next

Click on Install to start the upgradation.

Here the upgradation is started now.


Select color you want and Next.

Here am selecting Use express settings. If you want customize your settings select Customize.

Now we can see the Log in screen of Windows 8.1. Sign in with your windows 7 user account.


Upgradation is successully completed.

How to install Windows 8
Step 1
- Insert the installation disc and boot from CD/DVD drive
- Also we can install from USB devices by making boootable USB drives.
- Change Time and currency format to Enlish (India)
- Click Next.
Step 2
- Click Install Now.
Step 3
- Selectt the Version you want and click Next.
Step 4
- Accept the license agreement by checking I accept the license terms.
- Click Next.
Step 5
- Click Custom: Install windows only.
Step 6
- From here we need create Partitions for installation
- Clik on Drive options(advanced)
Step 7
- Select the Unallocated space and click New
- Give the partition size for drive.
- Click apply
Step 8
- For protecting the system files windows will create an additional partition of 350 MB
- Click OK
Step 9
- Select unallocated space and create the partition as we did before.
Step 10
- Select the partition in which you want to install Windows
- Click Next
Step 11
- Now the installation is started, it requires many time and PC will restart several times during the installation.
Step 12
- Pick a color and give a name for your PC
- Click Next
Step 13
- Click Use express settings if you don’t want to customize.
Step 14
- Give User name and Password for your account
- Click Finish
Finally installation of Windows 8 is completed and now move your work into Microsoft’s most advanced Operating System.


Install Windows 7.

Windows 7 is an Operating System from Microsoft. The first thing you will notice when you start using Windows 7 is that it looks so much like Vista. Vista had many problems but is also had many good features so Microsoft build upon the good in Vista and now we have Windows 7. You could say Windows 7 is a service pack to Vista – but is is more than that.
Step 1
- Insert the installation disk and boot From CD/DVD Drive.
- You can also install from network of other bootable device like USB drives.
Step 2
- Select Time and currency format to English(India)
- Click Next
Step 3
- Click Install Now.
Step 4
- Wait for a few seconds.
Step 5
- Select the Operating System you want here we are installing 32 bit of Windows 7
- Select Windows 7 Ultimate x86
- Click Next
Step 6
- Agree the License Agreement by checking I accept the license terms.
- Click Next
Step 7
- Select the type of installation here we have two options one is Upgrade and another one is Custom (advanced)
- Click Custom (Advanced)
Step 8
- Here we reached at the partition table of windows 7 we can see that our Disk space is 80 GB. In Windows 7 we can create only 4 partition during the installation time, aslo a partition of 100 MB will automatically create for saving the System Files. So its better to create only two partitions, one for the windows installation and the whole remaing space in one partition, because we can create partitions as we wish after completing the installation through Device Manager.
- Select the disk and click on new
- Give the partition size and click Apply
Step 9
- Click OK in the dialog box
Step 10
- Click Unallocated Space and click New
- Here we are creating 2 Partitions again so applied 30000 MB for the partition and Clicked OK
Step 11
- Finally creating the last partition so select the Unallocated Space and click New doesn’t need to change the size so click Apply.
Step 12
- Finally we completed the partitioning we can see that we created 3 partition and one 100 MB Special partition.
- Select the partition in which you want to install Windows 7 and Click Next
Step 13
- Windows 7 Installation is started.
Step 14
- Its a time requiring process depends upon the configuration of your PC
Step 15
- Your system will restart while installation in progress
Step 16
- Now the installation in almost completed
Step 17
- Just wait.
Step 18
- Give the user name for your PC, Here we gave user.
- Click Next.
Step 19
- Give password for your user account, its not compulsory but giving password is good for protecting your PC and datas.
- Click next.
Step 20
- Select the time zone and Click Next
Step 21
- Windows 7 is finalizing your settings just wait for a few seconds.
Step 22
- …….
Step 23
- Finally we installed Window 7 successfully.
- Check Device Manager for Driver installation.


Related articles
- Windows 7’s Aero in pictures (reviews.cnet.com)
How to install Back Track.
 BackTrack is intended for all audiences from the most savvy security professionals to early newcomers to the information security field. BackTrack promotes a quick and easy way to find and update the largest database of security tools collection to-date. Our community of users range from skilled penetration testers in the information security field, government entities, information technology, security enthusiasts, and individuals new to the security community.
Step 1
- Insert Back Track CD into the CD/DVD Drive and Boot from CD.
- Select BackTrack Text – Default Boot Text Mode.
- Press Enter

Step2
- Type startx and press Enter.

Step 3
- Double click on Install BackTrack.

Step 4
- Select the Language
- Click Forward.

Step 5
- Select the Location and Time zone.
- Click Forward.

Step 6
- Select the Keyboard Layout USA.
- Click Forward.

Step 7
- Select specify partitions manually
- Click Forward.

Step 8
- We can see a free space of 43 GB.
- Select the free space and click on New Partition Table.

Step 9
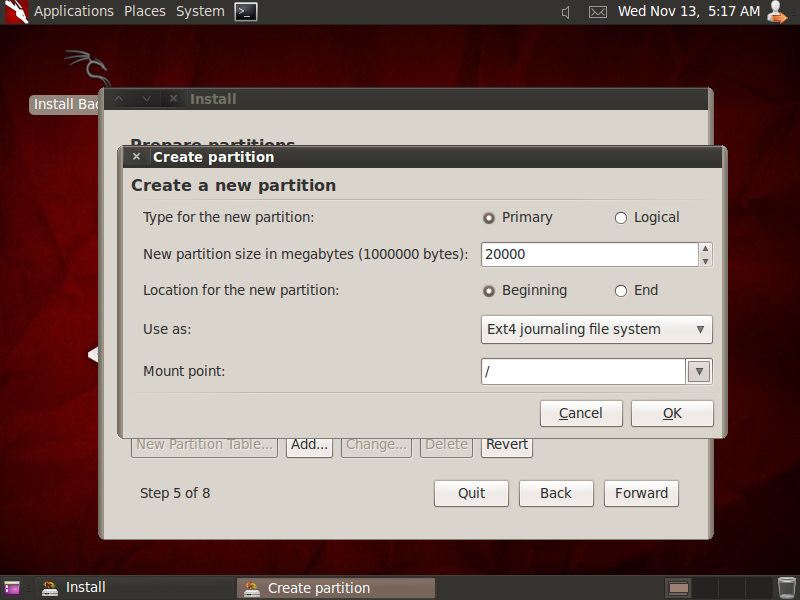
- Give the Size for Root [/] partition, here allotted 20000 MB for Root partition.
- Make sure that Use as: Ext4 Journaling File system
- Mount Point / [symbol of Root Partition]
- Click OK
Step 10
- Here we want to create the Swap Area, so select the free space and click Add

Step 11
- Created partition with 2949 MB and changed the value Use as: swap area
- Click OK

Step 12
- Now the partitioning is completed. Click Forward to continue the installation.

Step 13
- Click Install for starting the installation.

Step 14
- Installation started now…


Step 15
- Now the installation is completed click Restart Now..


Step 16
- Remove the Installation media and press enter.

Step 17
- Login as,
- User name : root
- Password : toor

- Type startx and press enter

Step 18

How to install Kali Linux.
 Kali Linux is a GPL-compliant Linux distribution built by penetration testers for penetration testers with development staff consisting of individuals spanning different languages, regions, industries, and nationalities.
The evolution of Kali took place over many years of development, penetration tests, and unprecedented help from the security community. Kali Linux originally started with earlier versions of live Linux distributions called BackTrack, Whoppix, IWHAX, and Auditor.
When it was initially developed, Kali was designed to be an all-in-one live CD to be used on security audits and was specifically crafted to not leave any remnants of itself on the system. With millions of downloads, it has become the most widely adopted penetration testing framework in existence and is used by the security community all over the world.
Step 1
- Make CD/DVD Drive first boot device in BIOS and insert the Kali Linux Bootable CD.
- Boot From CD/DVD Drive.
- Select Graphical Install and Press Enter
Step 2
- Select Language and Click Continue
Step 3
- Select Your Location and Press Enter


Step 4
- Select the Keyboard Layout and Press Enter.

Step 5
- Just wait while Configuring Network

Step 6
- Enter the Host Name for the system and press Continue.

Step 6
- Enter the Domain Name and Click Continue.

Step 7
- Set up Users and Passwords, give password for the Root account and Click Continue.

Step 8
- Select the Time Zone and Click Continue

Step 9
- We can partition our disk space in Four ways, Here we are going to partition in the last methode
- So select Manual and click Continue.

Step 10
- Here we can see that a 20 GB free space, will vary up to the size of hard disk your are using.
- Select the Free Space and press Enter
- We need create two Partitions one is Root and another one is Swap Area

Step 11
- Select Create a new partition and click Enter.

Step 12
- Give the Partition Size for the Root Partition.
- Here we are giving 18000 MB for Root
- Click Enter.

Step 13
- Select Location for the new Partition Beginning.
- Click Continue

Step 14
- Select Done setting up the partition Click Continue.
- Make sure that Mount Point is / (Symbol of Root Partition) and Ext4 is the file system

Step 15
- Select the Free Space and press Enter

Step 16
- Select Create a new partition
- Click Continue

Step 17
- We can see the remaining hard disk space, here only 3.5 Gb is remaining so we are going to give the whole size to Swap Area.
Step 18
- Select Use as: and press Enter.


Step 19
- Select Swap Area and Click Continue

Step 20
- Select Done setting up partition and Click Continue.

Step 21
- Select Finish partitioning and write changes to disk and click Continue.

Step 22
- Check Yes and click Continue.

Step 23
- Installation started now.


Step 24
- Check Yes if you want to Use a network mirror here we are checking No and Continuing.
Step 24
- Check Yes for installing GRUB Loader on the hard disk and click Continue.
Step 25
- Finally installation of Kali Linux is completed. Click Continue and after restarting we can login to Kali Linux.
Step I
Step II
Step III


