Microsoft
How to Solve error: This app can’t be activated by the Built-in Administrator in Windows 8.1
In Windows 8 and Windows 8.1, if you are using built-in Administrator account You can’t use some apps. We will get a error message that This app can’t use by built-in administrator or This app can’t be activated by the built-in administrator. Here the steps or solving this error.
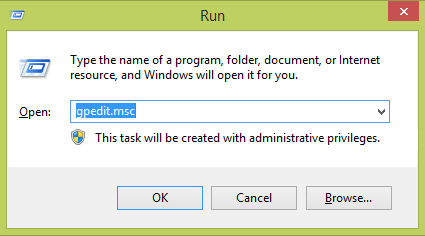
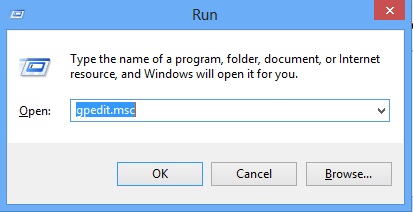
Open Group Policy Editor from Run
Windows + R
gpedit.msc
From Local Group Policy Editor Navigate to
Windows Settings > Security Settings > Local Policy > Security Options
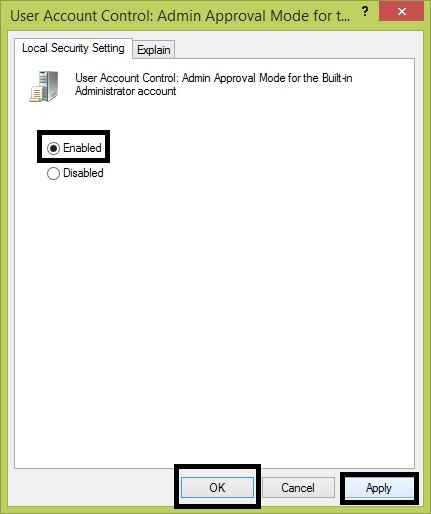
Enable the Policy User Account Control: Admin Approval Mode for the Built-in Administrator Account
Double click on the policy and Check Enabled then Apply > OK
Just Restart your PC and check. You can use the apps from Built-in Administrator account the error will not appear again.
This entry was posted in Windows and tagged Group Policy, Microsoft, Security, Windows 8, Windows 8.1, Windows Settings.
Remove Library Folders from My computer in Windows 8.1
In Windows 8.1, while we open My Computer we can see the library files like Downloads, Music, Pictures, Documents, and Videos. Also it can be accessed from the left side bar so Here we are going to remove the library files from My Computer for the easy access of Disk drives.
Step 1
Open Registry Edit from Run
Windows + R
Type regedit > Enter
Step 2
From Registry Editor navigate to HKEY_LOCAL_MACHINE\SOFTWARE\Microsoft\Windows\Current Version\explorer\MyComputer\NameSpace.
{1CF1260C-4DD0-4ebb-811F-33C572699FDE} Music Folders
{374DE290-123F-4565-9164-39C4925E467B} Downloads Folders
{3ADD1653-EB32-4cb0-BBD7-DFA0ABB5ACCA} Pictures Folders
{A0953C92-50DC-43bf-BE83-3742FED03C9C} Vedios Folders
{A8CDFF1C-4878-43be-B5FD-F8091C1C60D0} Documents Folders
{B4BFCC3A-DB2C-424C-B029-7FE99A87C641} Desktop Folders
From here we can see Six keys which representing the library folder. Delete the keys individually or delete the six keys for removing the library files from My Computer.
Here we deleted the keys
See that the Library Files are removed from My Computer
This entry was posted in Operating System Tips, Windows and tagged Microsoft, Microsoft Windows, My Documents, Windows 8.1, Windows Registry.
Family Safety a new feature in Windows 8
In Windows 8, Microsoft is carrying forward the parental control functionality from its predecessor, and it works almost exactly the same way, with a few useful improvements. Parental controls, called Family Safety in Windows 8, can be applied only to non-administrator accounts—including Microsoft accounts, which is indeed new to Windows 8—and is administered one account at a time
lets learn how to configure Family Safety in Windows 8
Step 1
You need to create a User Account, because Family Safety can be applied only to a non administrator account.
- My Computer > Right Click > Mangae > Local Users and Groups > Users
- Right click > New user >
Step 2
- Enter the User name, Password and create.
Step 3
- Make sure that the created user accounts in User Groups.
Step 4
- Open Control Pannel > User Accounts
Step 5
- Click Manage another account
- Enter the Administrator account password if User account Control dialog box pop up
Step 6
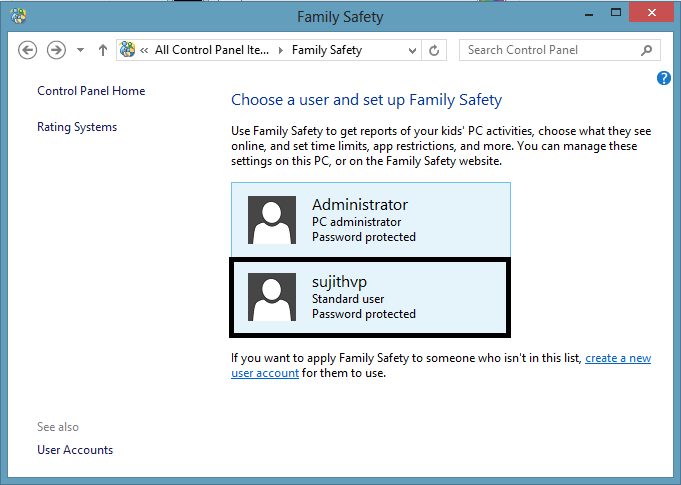
- Select the User account for setup family safety
Step 7
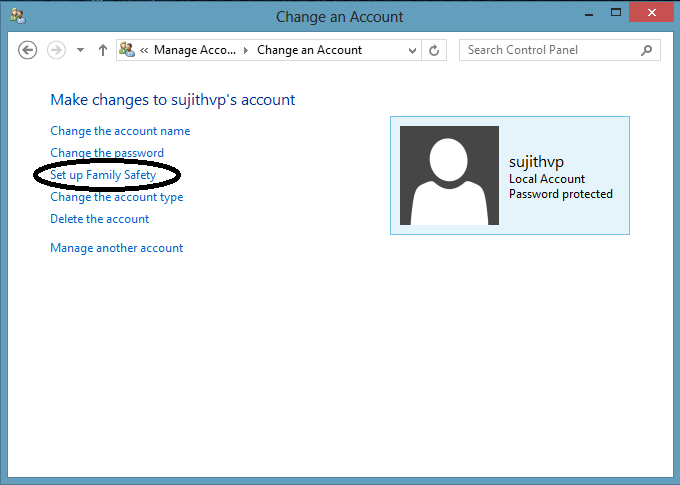
- Click on Set up Family Safety
- Enter the Administrator Account password if needed for user account control
Step 8
- Click the User Account
Step 9
- Turn on Family Safety by checking On, enforce current settings.
Web Filtering
By configuring Web filtering we can control the websites that user can access online.
Time Limits
Set up time limits for user. So they can only use the system for an amount of time that we allow. They can only use the system during a time range while enabling Curfew.
App Restrictions
By using this feature we can restrict the users from using the applications.
View activity monitor
We can check the user whole activities from here.
This entry was posted in Operating System Tips, Windows and tagged Microsoft, Microsoft Family Safety, Parental Control, Windows 8.
Install Windows 7.

Windows 7 is an Operating System from Microsoft. The first thing you will notice when you start using Windows 7 is that it looks so much like Vista. Vista had many problems but is also had many good features so Microsoft build upon the good in Vista and now we have Windows 7. You could say Windows 7 is a service pack to Vista – but is is more than that.
Step 1
- Insert the installation disk and boot From CD/DVD Drive.
- You can also install from network of other bootable device like USB drives.
Step 2
- Select Time and currency format to English(India)
- Click Next
Step 3
- Click Install Now.
Step 4
- Wait for a few seconds.
Step 5
- Select the Operating System you want here we are installing 32 bit of Windows 7
- Select Windows 7 Ultimate x86
- Click Next
Step 6
- Agree the License Agreement by checking I accept the license terms.
- Click Next
Step 7
- Select the type of installation here we have two options one is Upgrade and another one is Custom (advanced)
- Click Custom (Advanced)
Step 8
- Here we reached at the partition table of windows 7 we can see that our Disk space is 80 GB. In Windows 7 we can create only 4 partition during the installation time, aslo a partition of 100 MB will automatically create for saving the System Files. So its better to create only two partitions, one for the windows installation and the whole remaing space in one partition, because we can create partitions as we wish after completing the installation through Device Manager.
- Select the disk and click on new
- Give the partition size and click Apply
Step 9
- Click OK in the dialog box
Step 10
- Click Unallocated Space and click New
- Here we are creating 2 Partitions again so applied 30000 MB for the partition and Clicked OK
Step 11
- Finally creating the last partition so select the Unallocated Space and click New doesn’t need to change the size so click Apply.
Step 12
- Finally we completed the partitioning we can see that we created 3 partition and one 100 MB Special partition.
- Select the partition in which you want to install Windows 7 and Click Next
Step 13
- Windows 7 Installation is started.
Step 14
- Its a time requiring process depends upon the configuration of your PC
Step 15
- Your system will restart while installation in progress
Step 16
- Now the installation in almost completed
Step 17
- Just wait.
Step 18
- Give the user name for your PC, Here we gave user.
- Click Next.
Step 19
- Give password for your user account, its not compulsory but giving password is good for protecting your PC and datas.
- Click next.
Step 20
- Select the time zone and Click Next
Step 21
- Windows 7 is finalizing your settings just wait for a few seconds.
Step 22
- …….
Step 23
- Finally we installed Window 7 successfully.
- Check Device Manager for Driver installation.
Related articles
- Windows 7’s Aero in pictures (reviews.cnet.com)
This entry was posted in Operating System Installations, Windows and tagged Microsoft, Operating system, Windows 7.
Windows 7 logon – avoid clicking user icon
- Open Run
- Start > All Programmes > Accessories > Run
- Windows+R
- Click Windows Settings > Security Settings
- Open Local Policies
- Open Security Options
- Double Click on “Interactive Logon: Do not display last user name”
- check the Enable options and Press OK
Just close the window and check the changes by Logging Off your PC….
This entry was posted in Operating System Tips and tagged Microsoft, Operating system, Password, Security, Windows 7.
