Tips and Tricks
How to Install Two Whatsapp on Lenovo Vibe S1. Lenovo Secure Zone, Special Feature of Lenovo.

Its being a long period we are posting something on this page. We are extremely sorry for that to our valuable viewers. So today we are going to talk about one of the advanced feature of Lenovo phones, now available in market. Its known as Secure Zone.
I felt this feature like VMware in PC, like a virtual phone. Simply we will get an another phone inside it. There is a special thanks to my sister, because I got this information from her phone when I used that one for a few days. About the phone, the performance was excellent and also the advanced options like this will make this phone something special, surely I hope this model will bring some more market space for Lenovo.
Actually its creates an alternate user account which allows you to configure the apps, accounts, wallpapers, app data, lock screen passwords that are different from the Open Zone. You can simply switch between Open Zone and Secure Zone by taping on the Secure Zone button on the notification bar.
Features:
- Cross-zone notifications: Notifications from Secure Zone are displayed in Open Zone with a small red dot to differentiate between the two. Unfortunately, while in Secure Zone, you won’t see notifications in Open Zone.
- Data isolation: App data and files are not shared between Open Zone and Secure Zone. Contacts, Messages and the Call log is shared though. This is enable the smooth running of this feature on your device. You can still access internal storage data in the OpenUserData folder.
- Apps from the Open Zone can be shared with Secure Zone (App data will not be shared). What this means is that you can have dual accounts of your favorite apps running simultaneously. You can have 2 accounts of WhatsApp, Telegram, Skype, Google, etc in the two Zones.
- A floating button on your screen allows for quick switching between the Zones. Both accounts remain active unless you delete Secure Zone. Unfortunately, you will notice a slight lag after switching to a new Zone.
- You can secure your Secure Zone with a lock screen pattern, PIN or password to stop unauthorised access. You can automatically switch to Open Zone after screen lock by clicking this setting Secure Zone Management.
Lets check how to enable this feature.
Step 1
Go to Phone Settings > System > Secure Zone Management.

Step 2
Just pass the following screens, same time reading these will be usefull for you if you are not in hurry 🙂
Step 3
Tap OK for activating Secure Zone and move on to Configuration
Step 4
Set lock for the Secure Zone
Step 5
You will get three option Pattern, Pin and Password. Select the suitable one for you. Here I am choosing Pattern.
Step 6
The next configuration is related with how do you want to show the notification. Its better to select last one for the extreme privacy. On the next move we can select the apps already installed in Open Zone to avail in Secure Zone also
Step 7
Here the last one, finally you completed the configuration and now Secure Zone feature is enabled on your phone.
How to transfer Contacts, Music, Pictures, Videos from Android to iPhone
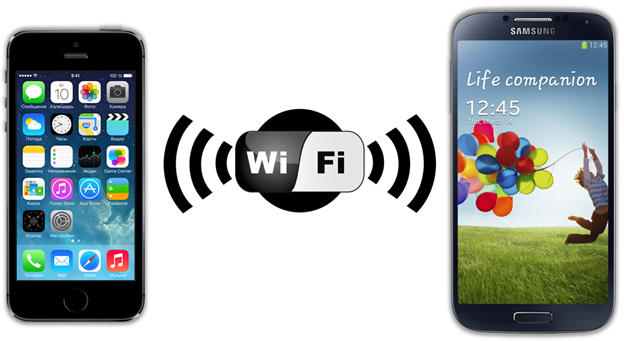
When we purchase new phone the big headache is data transferring between the old one and new one. Here we are explaining how to transfer contacts from Android phone to iPhone. How to transfer apps from Android to iPhone. How to transfer photos from Android to iPhone. And, yes, how to transfer music from Android to iPhone. Basically, how to move from Android to iPhone with using a simple app and WiFi. This post will also help you to transfer data from your windows laptop to iPhone without using iTunes.
This app will also help you to transfer between two android phones or between mobiles and Computer.
Here we are starting.
Connect both phones into WiFi.
Install app Shareit from app store on both Phones.
Open Play store.
Search Shareit
Install.
Go to app store and install Shareit.
Sending files to iPhone
Open Shareit from Android Phone
You can see options which you want to share, contacts, pictures, videos, app, files
Here Iam sending some pictures from my android phone to iPhone. First open Shareit and select Send. Next select the pictures for sharing.
Select Next.
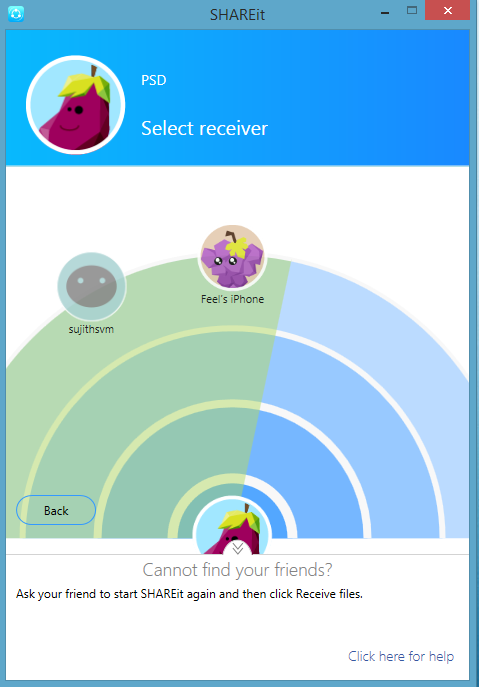
At the same time in iPhone Open Shareit and select Receive.
Now in Android phone iPhone will be detect. Select the iPhone, then the data sending will be started. Some times iPhone may one confirmation msg will come please allow the connection.
After sending all files select Finish. In the same way you can send all your contacts, videos, apps, and files between the phones. While sending apps between Android and iPhone mostly it will not work. If you sending data between two Android or two iPhone you can send the apps without any problem.
How to share data between PC and Mobiles using Shareit
For sending data between computer and mobile you need to download software for shareit from online. Also you can download from the following link
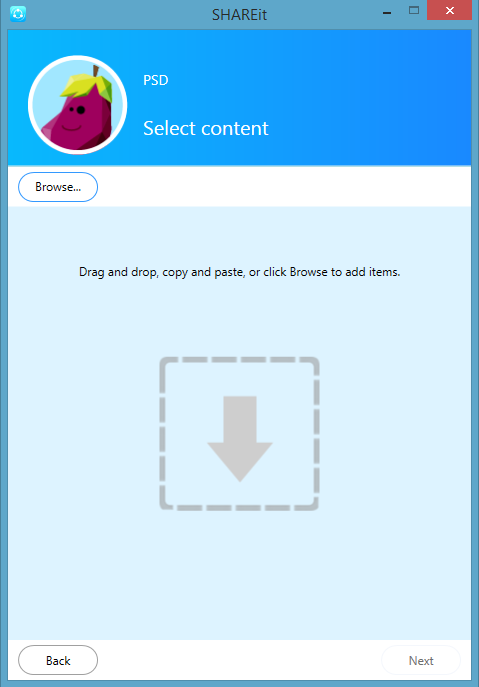
Install software and open. Click on Send
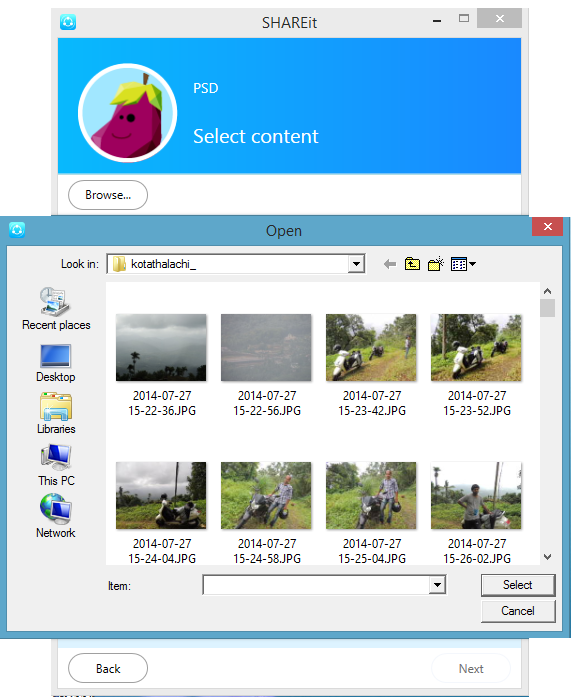
Click on Browse.
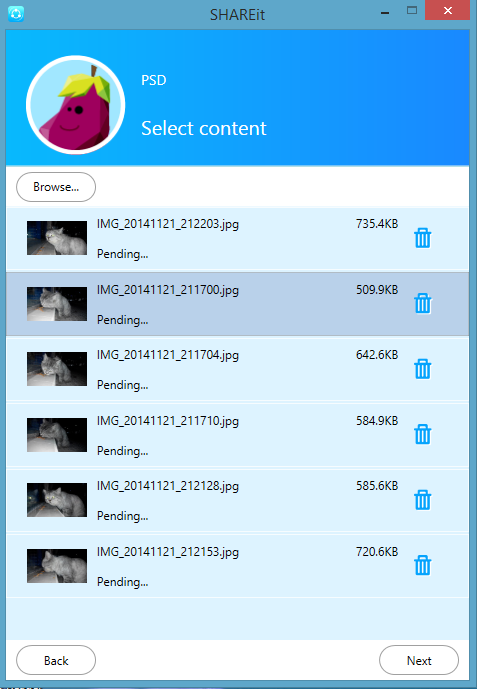
Select the files and click Select.
Click on Next
Now its searching for the phones in our network.
Here we got two phones one is Andriod and other one is IOS
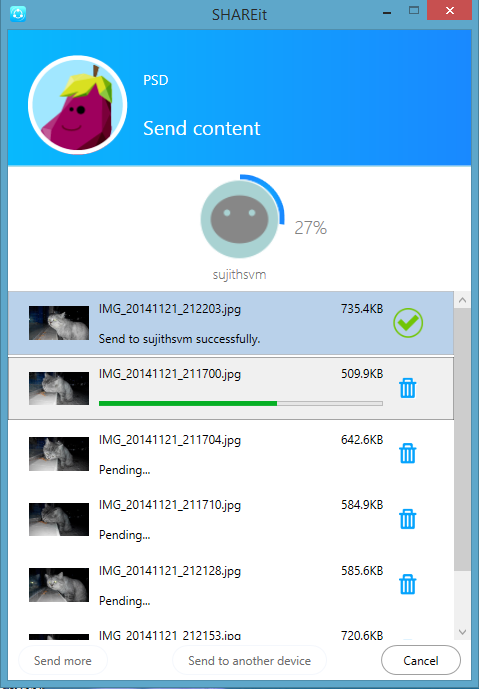
Select the phone to which you want to share the datas. The data transering will start.
Hope this post will be helpful to you all. In the same way we can also send data from our mobile to PC. It will be useful for iPhone users who facing difficult in data transferring through iTunes. If you don’t have a WiFi, if your phone have WiFi hop spot feature just enable and connect the other phone to the hot spot and share your data.
How to remove Login History in Skype……
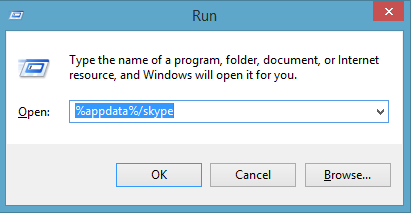
Its so simple to remove the Skype name from the Skype sign-in screen. Here the steps for removing login details in Skype.
Go to Run
WIN + R
Type the following comand.
%appdata%/skype
Click on OK.
Then from this folder Delete the folder named with your skype name….
Then open Skype and you can see…..
The Ultimate Command Tweaks…
 Command Prompt is one of the most powerful tools in Windows; but sadly, it is also the most ignored one. Things were not always like this; but with the advent of GUI based operating systems, people started feeling that computing through command based tools was boring. This ultimately lead the command prompt into obscurity.
However, the command prompt is not useless. In fact, it can be pretty useful. This article provides some excellent tricks, secrets and hacks that will make you realize that the Windows Command Prompt is not only useful but also a tool that you should definitely give more respect to
Here Iam going to show some simple Windows commands which is more powerful and useful for doing tasks faster.
Starting Command Prompt
Before moving to Command Prompt tricks let me to show how to open Command Prompt. Normally we can open Command Prompt through Run, press Win+R keys, type CMD and press enter.
Commands
|
C: |
Go to C: drive. Similarly D: , E: , F |
|
CD |
Change directory. When you change directory, the prompt changes, showing the path of the directory you are currently in. |
CD <Directory Name>
Will take you to that directory, also you can add one or more sub directories separated by ” \ “
e.g. CD Windows
CD Windwos\System32
CD..
Moves you one level up the directory tree (i.e. up towards the root directory).
CD\
Takes you to the top of the directory tree (Root Directory) .
|
MD |
Make directory. Creates a new directory below the current one. (The command can also be written as MKDIR) |
MD <Path\Directory Name>
Will create a directory
MD abc
Will create a directory named ABC at the present working directory
MD d:\abc
Will create a directory named abc at d: drive
MD 1 2 3 4 5
Will create directories named 1, 2, 3, 4, 5
MD d:\1\2\3\4\5
Will create a directories named 5 as following path d:\1\2\3\4
|
RD |
Remove Directory |
RD <Path\Directory Name>
Using for removing the directories, e.g.
RD d:\abc
Will remove the directory named ‘abc’ from D: drive
RD 1 2 3 4 5
Using this command for removing multiple folders at same time here directories named as 1 2 3 4 5 will be removed
RD 1\2\3\4\5
Will remove the directory ‘5’ from the path 1\2\3\4
RD /s /q [drive path]
RD will delete only an empty folder. So we can’t delete a folder is it contains a file by using this command we can delete a folder, even its contains files.
/s = Delete all files and subfolders in addition to the folder itself. Use this to remove an entire folder tree.
/q =Quiet – do not display YN confirmation
|
DIR |
Display a list of files and subfolders |
DIR [path] [display_format]
DIR is used to view the files and sub folders of the directory. Here am mentioning the path in every commands and its not compulsory to mention the path if you want to show the details of your current path.
DIR e:\
This command will show the filed and folders from E: drive.
DIR e:\ /p
This will gave the result same as DIR e:\ but will pause after each screen of data.
DIR e:\ /w
Will show a wide List format, sorted horizontally.
DIR e:\ /s
Will show all folders and its sub folders in detail.
DIR e:\ /ah
Will show the hidden files and folders in the path.
| ATTRIB | To change file attributes. |
ATTRIB [ + attribute | – attribute] [path]
+ : Turn an attribute ON
- : Clear an attribute OFF
Attributes
S : System
R : Read Only
H : Hidden
A : Archive
Attrib +s d:\123.txt
This will add System attribute to the file D:\123.txt
Attrib -s d:\123.txt
Here the system attribute will remove to the file d:\123.txt
Attrib +h d:\123.txt
Will make the file hidden also if you want to apply hidden attribute for a folder use this attrib +h d:\abc
here abc is the folder name
Attrib -r -s -h c:\ntldr
In windows XP we can use this command for removing all atributes for the system file NTLDR. Normally when we try to delete NTLDR from command prompt we will get an error that, access is denied, that time we can use this command for removing the attributes and delete the files.
|
COPY |
Copy one or more files to another location |
COPY [File Path] [Destination]
We can copy files to another location through this command.
COPY 123.txt 1234.txt
This will copy 123.txt file from the current folder to the same path as 1234.txt.
COPY "C:\my work\123.txt" "D:\New docs\123.txt"
Its for copying the file from different location
COPY H:\123\*.txt h:\1234
This is for copying only a specified type of files. Here this command will copy all text files (*.txt) from the location H:\123 to H:\1234
| MOVE | Move one or more files to another location |
MOVE [Current Path] [Destination Path]
Same as the COPY command here MOVE will help us to move one or more files to another location.
MOVE 123.txt e:\
For moving the file 123.txt to E: drive.
MOVE c:\apple\123.txt e:\orange\123.txt
The file 123.txt from c:\apple will be moved to E:\orange, When we use this command.
MOVE d:\abc\*.jpg E:\pictures
When we want to move a special kind of files we can use this command. Here I am moving all JPG files from D:\abc to E:\pictures.
|
REN |
Rename the files. |
REN command is used to rename files and folders.
REN d:\123.txt 1234.txt
This will rename the 123.txt file from D:\ into 1234.txt
REN d:\abc abcd
Here we are renaming a folder. Folder abc will rename as abcd
| NET | The NET command is used to manage network security resources |
The NET command is used to manage network security resources as follows:
NET user
To view user accounts details.
NET user [User name] [password] /add
This is for creating a new user account for e.g. “Net user admin apple /add” will create a new user named admin and its password is apple
NET user [User Name] /delete
likewise adding a user account this command used to delete an user account.
Net user [User name] /active:[yes | no]
This command is used for enabling or disabling a user account for example in Windows 7 onwards the default administrator account is disabled by default. We can enable the built in administrator account by this command. Net user administrator /active:yes. Some time to get the output successfuly we may required to run Command prompt as Administrator.
| CONVERT | Convert a FAT16 or a FAT32 DISK volume to NTFS. |
Convert [Volume Drive] /fs:ntfs
Convert e: /fs:ntfs
Here we are converting e: drive’s file system into NTFS.
|
FORMAT |
Using for format a disk for windows. |
FORMAT [drive] [/FS:file system] [/V:volume label] /Q
/FS:file system The file system (FAT or NTFS)
/V:volume label The volume label
/Q Quick Format
FORMAT D: /FS:ntfs /V:local_Disk /Q
Here the D: drive will format with the NTFS filesystem using quick format
| IPCONFIG | Configure IP (Internet Protocol Configuration) |
IPCONFIG
Show the Internet Protocol coniguration of the network adpater.
IPCONFIG /ALL
Show full configuration inormation o the network adapter.
IPCONFIG /RENEW
Renew IP address for all Network adapters.
|
PING |
Test a network connection – if successful, ping returns the ip address. |
PING [options] destination_host
PING 192.168.10.1
Will ping with the host address 192.168.10.1
PING google.com
Will ping with google.com and also we will get the IP address of http://www.google.com
|
SHUTDOWN |
Shutdown the computer |
SHUTDOWN -R
Shutdown and restart the PC within 60 seconds and in Windows XP it will be in 30 seconds.
SHUTDOWN -S
Shut down the PC
SHUTDOWN -H
Will hibernate the PC
SHUTDOWN -P
Turn off the local computer with no time-out or warning
SHUTDOWN -L
Will log off the PC
SHUTDOWN -A
Abort the system shutdown (with in the warning time)
SHUTDOWN -S /T 45
Here we can also custome the warning time too (here warning time is redused to 45 seconds by adding /t 45)
|
SYSTEMINFO |
Will show complete system info. |
SOME OTHER COMMANDS
| TASKLIST | Task List displays all running applications and services with their Process ID |
| TIME | Display the System Time |
| TYPE | Display the contents of a Text file |
| VER | Display the version information |
| CMD | Open a new Command shell |
| DATE | Display the system date |
| APPWIZ.CPL | Add/remove Programmes |
| CONTROL ADMINTOOLS | Show the Administrative Tools |
| CLEANMGR | Disk Cleanup Wizard |
| CONTROL COLOR | Display Properties |
| COMPMGMT.MSC | Computer Management |
| CONTROL FOLDERS | Folder Options |
| CHRMAP | Character Map |
| CHKDSK | Check Disk Utility |
| CALC | Open Calculator |
| DEVMGMT.MSC | Open Device Manager |
| DISKMGMT.MSC | Open Disk Management |
| EXPLORER | Open My Documents |
| FSMGMT.MSC | Open Shared Folders |
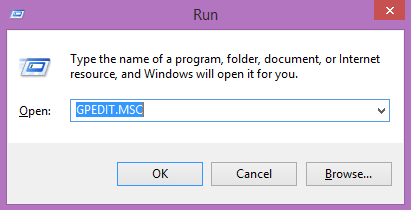
| GPEDIT.MSC | Open Group Policy Editor |
| IEXPLORER | Open Internet Explorer |
| LUSRMGR | Open Local Users and Groups |
| MAGNIFY | Open Magnifier |
| MSCONFIG | Open System Configuration Utility |
| MSINFO32 | Open System Information |
| MSPAINT | Open MS Paint |
| MSTSC | Open Remote Desktop |
| MMSYS.CPL | Open Sounds and Audio |
| NOTEPAD | Open a new Notepad |
| NCPA.CPL | Open Network Connections |
| NETSETUP.CPL | Open Network Setup Wizard |
| OSK | Open On Screen Keyboard |
| POWERCFG.CPL | Open Power Options |
| REGEDIT | Open Registry Editor |
| SERVICES.MSC | Open Services |
| SYSKEY | Open Windows System Security Tool |
| WSCUI.CPL | Open Security Center |
| WMPLAYER | Open Windows Media Player |
| WINVER | Displays Windows version |
| SHRPUBW | Open Shared Folder Wizard |
How to remove items from Control Pannel using Group Policy
I am showing the steps for removing control panel items using Group Policy. By doing this we can restrict others from accessing unwanted options in control panel.
Open Group Policy Editor
Go to Administrative templates under User Configuration
Open Control Panel
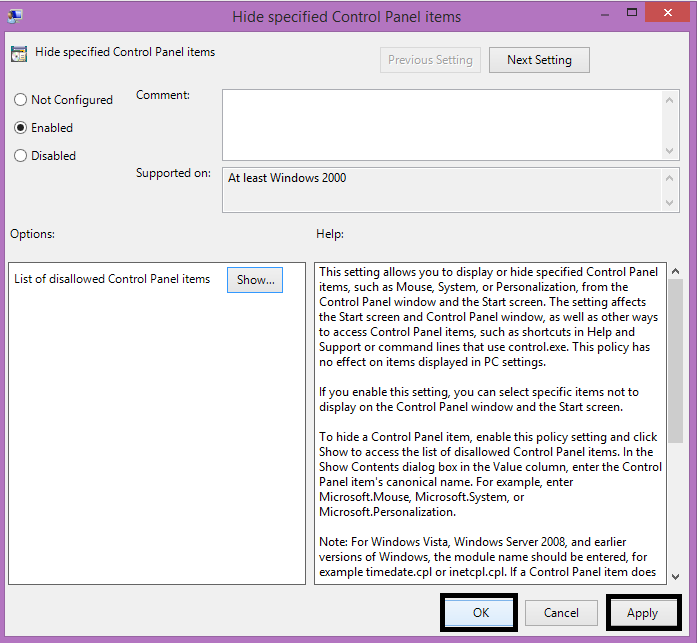
Open the item Hide specified Control Panel Items
By default it will not be activated. so we need to enable it, click on enabled button and click on show button for assigning the values
Here Iam removing Administrative Tools so entered the canonical name o Administrative tools and click on OK
Then click Apply – OK
At last we can see that the Administrative Tools are removed from the control panel.
Here the canonical names of every control panel items.
Action Center
- Canonical name: Microsoft.ActionCenter
- GUID: {BB64F8A7-BEE7-4E1A-AB8D-7D8273F7FDB6}
- Supported OS: Windows 7, Windows 8, Windows 8.1
- Module name: @%SystemRoot%\System32\ActionCenterCPL.dll,-1
- Pages
| Page Name | Opens |
| MaintenanceSettings | Automatic Maintenance |
| pageProblems | Problem Reports |
| pageReliabilityView | Reliability Monitor |
| pageResponseArchive | Archived Messages |
| pageSettings | Problem Reporting Settings |
Administrative Tools
- Canonical name: Microsoft.AdministrativeTools
- GUID: {D20EA4E1-3957-11d2-A40B-0C5020524153}
- Supported OS: Windows Vista, Windows 7, Windows 8, Windows 8.1
- Module name: @%SystemRoot%\system32\shell32.dll,-22982
AutoPlay
- Canonical name: Microsoft.AutoPlay
- GUID: {9C60DE1E-E5FC-40f4-A487-460851A8D915}
- Supported OS: Windows Vista, Windows 7, Windows 8, Windows 8.1
- Module name: @%SystemRoot%\System32\autoplay.dll,-1
Biometric Devices
- Canonical name: Microsoft.BiometricDevices
- GUID: {0142e4d0-fb7a-11dc-ba4a-000ffe7ab428}
- Supported OS: Windows 7, Windows 8, Windows 8.1
- Module name: @%SystemRoot%\System32\biocpl.dll,-1
BitLocker Drive Encryption
- Canonical name: Microsoft.BitLockerDriveEncryption
- GUID: {D9EF8727-CAC2-4e60-809E-86F80A666C91}
- Supported OS: Windows Vista, Windows 7, Windows 8, Windows 8.1
- Module name: @%SystemRoot%\System32\fvecpl.dll,-1
Color Management
- Canonical name: Microsoft.ColorManagement
- GUID: {B2C761C6-29BC-4f19-9251-E6195265BAF1}
- Supported OS: Windows Vista, Windows 7, Windows 8, Windows 8.1
- Module name: @%systemroot%\system32\colorcpl.exe,-6
Credential Manager
- Canonical name: Microsoft.CredentialManager
- GUID: {1206F5F1-0569-412C-8FEC-3204630DFB70}
- Supported OS: Windows 7, Windows 8, Windows 8.1
- Module name: @%SystemRoot%\system32\Vault.dll,-1
- Pages
| Page Name | Opens |
| ?SelectedVault=CredmanVault | Windows Credentials |
Date and Time
- Canonical name: Microsoft.DateAndTime
- GUID: {E2E7934B-DCE5-43C4-9576-7FE4F75E7480}
- Supported OS: Windows Vista, Windows 7, Windows 8, Windows 8.1
- Module name: @%SystemRoot%\System32\timedate.cpl,-51
- Pages
| Page Name | Opens |
| 1 | Additional Clocks |
Default Programs
- Canonical name: Microsoft.DefaultPrograms
- GUID: {17cd9488-1228-4b2f-88ce-4298e93e0966}
- Supported OS: Windows Vista, Windows 7, Windows 8, Windows 8.1
- Module name: @%SystemRoot%\System32\sud.dll,-1
- Pages
| Page Name | Opens |
| pageDefaultProgram | Set Default Programs |
| pageFileAssoc | Set Associations |
Device Manager
- Canonical name: Microsoft.DeviceManager
- GUID: {74246bfc-4c96-11d0-abef-0020af6b0b7a}
- Supported OS: Windows Vista, Windows 7, Windows 8, Windows 8.1
- Module name: @%SystemRoot%\System32\devmgr.dll,-4
Devices and Printers
- Canonical name: Microsoft.DevicesAndPrinters
- GUID: {A8A91A66-3A7D-4424-8D24-04E180695C7A}
- Supported OS: Windows 7, Windows 8, Windows 8.1
- Module name: @%systemroot%\system32\DeviceCenter.dll,-1000
Display
- Canonical name: Microsoft.Display
- GUID: {C555438B-3C23-4769-A71F-B6D3D9B6053A}
- Supported OS: Windows 7, Windows 8, Windows 8.1
- Module name: @%SystemRoot%\System32\Display.dll,-1
- Pages
| Page Name | Opens |
| Settings | Screen Resolution |
Ease of Access Center
- Canonical name: Microsoft.EaseOfAccessCenter
- GUID: {D555645E-D4F8-4c29-A827-D93C859C4F2A}
- Supported OS: Windows Vista, Windows 7, Windows 8, Windows 8.1
- Module name: @%SystemRoot%\System32\accessibilitycpl.dll,-10
- Pages
| Page Name | Opens |
| pageEasierToClick | Make the mouse easier to use |
| pageEasierToSee | Make the computer easier to see |
| pageEasierWithSounds | Use text or visual alternatives for sounds |
| pageFilterKeysSettings | Set up Filter Keys |
| pageKeyboardEasierToUse | Make the keyboard easier to use |
| pageNoMouseOrKeyboard | Use the computer without a mouse or keyboard |
| pageNoVisual | Use the computer without a display |
| pageQuestionsCognitive | Get recommendations to make your computer easier to use (cognitive) |
| pageQuestionsEyesight | Get recommendations to make your computer easier to use (eyesight) |
Family Safety
- Canonical name: Microsoft.ParentalControls
- GUID: {96AE8D84-A250-4520-95A5-A47A7E3C548B}
- Supported OS: Windows Vista, Windows 7, Windows 8, Windows 8.1
- Module name: @%SystemRoot%\System32\wpccpl.dll,-100
- Pages
| Page Name | Opens |
| pageUserHub | Choose a user and set up Family Safety |
File History
- Canonical name: Microsoft.FileHistory
- GUID: {F6B6E965-E9B2-444B-9286-10C9152EDBC5}
- Supported OS: Windows 8, Windows 8.1
- Module name: @%SystemRoot%\System32\fhcpl.dll,-52
- File History includes a newer version of the Backup and Restore item, but that older item’s canonical name does not remap to File History.
Folder Options
- Canonical name: Microsoft.FolderOptions
- GUID: {6DFD7C5C-2451-11d3-A299-00C04F8EF6AF}
- Supported OS: Windows Vista, Windows 7, Windows 8, Windows 8.1
- Module name: @%SystemRoot%\system32\shell32.dll,-22985
Fonts
- Canonical name: Microsoft.Fonts
- GUID: {93412589-74D4-4E4E-AD0E-E0CB621440FD}
- Supported OS: Windows Vista, Windows 7, Windows 8, Windows 8.1
- Module name: @%SystemRoot%\System32\FontExt.dll,-8007
HomeGroup
- Canonical name: Microsoft.HomeGroup
- GUID: {67CA7650-96E6-4FDD-BB43-A8E774F73A57}
- Supported OS: Windows 7, Windows 8, Windows 8.1
- Module name: @%SystemRoot%\System32\hgcpl.dll,-1
Indexing Options
- Canonical name: Microsoft.IndexingOptions
- GUID: {87D66A43-7B11-4A28-9811-C86EE395ACF7}
- Supported OS: Windows Vista, Windows 7, Windows 8, Windows 8.1
- Module name: @%SystemRoot%\System32\srchadmin.dll,-601
Infrared
- Canonical name: Microsoft.Infrared
- GUID: {A0275511-0E86-4ECA-97C2-ECD8F1221D08}
- Supported OS: Windows 7, Windows 8, Windows 8.1
- Module name: @%SystemRoot%\System32\irprops.cpl,-1
Internet Options
- Canonical name: Microsoft.InternetOptions
- GUID: {A3DD4F92-658A-410F-84FD-6FBBBEF2FFFE}
- Supported OS: Windows Vista, Windows 7, Windows 8, Windows 8.1
- Module name: @C:\Windows\System32\inetcpl.cpl,-4312
- Pages
| Page Name | Opens |
| 1 | Security |
| 2 | Privacy |
| 3 | Content |
| 4 | Connections |
| 5 | Programs |
| 6 | Advanced |
iSCSI Initiator
- Canonical name: Microsoft.iSCSIInitiator
- GUID: {A304259D-52B8-4526-8B1A-A1D6CECC8243}
- Supported OS: Windows Vista, Windows 7, Windows 8, Windows 8.1
- Module name: @%SystemRoot%\System32\iscsicpl.dll,-5001
iSNS Server
- Canonical name: Microsoft.iSNSServer
- GUID: {0D2A3442-5181-4E3A-9BD4-83BD10AF3D76}
- Supported OS: Windows Vista, Windows 7, Windows 8, Windows 8.1
- Module name: @%SystemRoot%\System32\isnssrv.dll,-5005
- This Control Panel item will be seen only in server versions of Windows.
Keyboard
- Canonical name: Microsoft.Keyboard
- GUID: {725BE8F7-668E-4C7B-8F90-46BDB0936430}
- Supported OS: Windows Vista, Windows 7, Windows 8, Windows 8.1
- Module name: @%SystemRoot%\System32\main.cpl,-102
Language
- Canonical name: Microsoft.Language
- GUID: {BF782CC9-5A52-4A17-806C-2A894FFEEAC5}
- Supported OS: Windows 8, Windows 8.1
- Module name: @%SystemRoot%\System32\UserLanguagesCpl.dll,-1
Location Settings
- Canonical name: Microsoft.LocationSettings
- GUID: {E9950154-C418-419e-A90A-20C5287AE24B}
- Supported OS: Windows 8, Windows 8.1
- Module name: @%SystemRoot%\System32\SensorsCpl.dll,-1
Mouse
- Canonical name: Microsoft.Mouse
- GUID: {6C8EEC18-8D75-41B2-A177-8831D59D2D50}
- Supported OS: Windows Vista, Windows 7, Windows 8, Windows 8.1
- Module name: @%SystemRoot%\System32\main.cpl,-100
- Pages
| Page Name | Opens |
| 1 | Pointers |
| 2 | Pointer Options |
| 3 | Wheel |
| 4 | Hardware |
MPIOConfiguration
- Canonical name: Microsoft.MPIOConfiguration
- GUID: {AB3BE6AA-7561-4838-AB77-ACF8427DF426}
- Supported OS: Windows 7, Windows 8, Windows 8.1
- Module name: @%SystemRoot%\System32\mpiocpl.dll,-1000
- This Control Panel item will be seen only in server versions of Windows.
Network and Sharing Center
- Canonical name: Microsoft.NetworkAndSharingCenter
- GUID: {8E908FC9-BECC-40f6-915B-F4CA0E70D03D}
- Supported OS: Windows Vista, Windows 7, Windows 8, Windows 8.1
- Module name: @%SystemRoot%\System32\netcenter.dll,-1
- Pages
| Page Name | Opens |
| Advanced | Advanced sharing settings |
| ShareMedia | Media streaming options |
Notification Area Icons
- Canonical name: Microsoft.NotificationAreaIcons
- GUID: {05d7b0f4-2121-4eff-bf6b-ed3f69b894d9}
- Supported OS: Windows 7, Windows 8, Windows 8.1
- Module name: @%SystemRoot%\System32\taskbarcpl.dll,-1
Pen and Touch
- Canonical name: Microsoft.PenAndTouch
- GUID: {F82DF8F7-8B9F-442E-A48C-818EA735FF9B}
- Supported OS: Windows 7, Windows 8, Windows 8.1
- Module name: @%SystemRoot%\System32\tabletpc.cpl,-10103
- Pages
| Page Name | Opens |
| 1 | Flicks |
| 2 | Handwriting |
Personalization
- Canonical name: Microsoft.Personalization
- GUID: {ED834ED6-4B5A-4bfe-8F11-A626DCB6A921}
- Supported OS: Windows Vista, Windows 7, Windows 8, Windows 8.1
- Module name: @%SystemRoot%\System32\themecpl.dll,-1
- Pages
| Page Name | Opens |
| pageColorization | Color and Appearance |
| pageWallpaper | Desktop Background |
Phone and Modem
- Canonical name: Microsoft.PhoneAndModem
- GUID: {40419485-C444-4567-851A-2DD7BFA1684D}
- Supported OS: Windows 7, Windows 8, Windows 8.1
- Module name: @%SystemRoot%\System32\telephon.cpl,-1
- The window that this value launches is titled “Location Information” in versions of Windows prior to Windows 8. The item’s UI is considerably changed as of Windows 8.
Power Options
- Canonical name: Microsoft.PowerOptions
- GUID: {025A5937-A6BE-4686-A844-36FE4BEC8B6D}
- Supported OS: Windows Vista, Windows 7, Windows 8, Windows 8.1
- Module name: @%SystemRoot%\System32\powercpl.dll,-1
- Pages
| Page Name | Opens |
| pageGlobalSettings | System Settings |
| pagePlanSettings | Edit Plan Settings |
Programs and Features
- Canonical name: Microsoft.ProgramsAndFeatures
- GUID: {7b81be6a-ce2b-4676-a29e-eb907a5126c5}
- Supported OS: Windows Vista, Windows 7, Windows 8, Windows 8.1
- Module name: @%systemroot%\system32\appwiz.cpl,-159
- Pages
| Page Name | Opens |
| ::{D450A8A1-9568-45C7-9C0E-B4F9FB4537BD} | Installed Updates |
Recovery
- Canonical name: Microsoft.Recovery
- GUID: {9FE63AFD-59CF-4419-9775-ABCC3849F861}
- Supported OS: Windows 7, Windows 8, Windows 8.1
- Module name: @%SystemRoot%\System32\recovery.dll,-101
Region
- Canonical name: Microsoft.RegionAndLanguage
- GUID: {62D8ED13-C9D0-4CE8-A914-47DD628FB1B0}
- Supported OS: Windows 7, Windows 8, Windows 8.1
- Module name: @%SystemRoot%\System32\intl.cpl,-1
- The Region and Language item found in Windows 7 was split as of Windows 8. Microsoft.RegionAndLanguage now launches the Region item. To launch the Language item, use Microsoft.Language.
- Pages
| Page Name | Opens |
| 1 | Location |
| 2 | Administrative |
RemoteApp and Desktop Connections
- Canonical name: Microsoft.RemoteAppAndDesktopConnections
- GUID: {241D7C96-F8BF-4F85-B01F-E2B043341A4B}
- Supported OS: Windows 7, Windows 8, Windows 8.1
- Module name: @%SystemRoot%\System32\tsworkspace.dll,-15300
Sound
- Canonical name: Microsoft.Sound
- GUID: {F2DDFC82-8F12-4CDD-B7DC-D4FE1425AA4D}
- Supported OS: Windows 7, Windows 8, Windows 8.1
- Module name: @%SystemRoot%\System32\mmsys.cpl,-300
Speech Recognition
- Canonical name: Microsoft.SpeechRecognition
- GUID: {58E3C745-D971-4081-9034-86E34B30836A}
- Supported OS: Windows 7, Windows 8, Windows 8.1
- Module name: @%SystemRoot%\System32\Speech\SpeechUX\speechuxcpl.dll,-1
Storage Spaces
- Canonical name: Microsoft.StorageSpaces
- GUID: {F942C606-0914-47AB-BE56-1321B8035096}
- Supported OS: Windows 8, Windows 8.1
- Module name: @C:\Windows\System32\SpaceControl.dll,-1
Sync Center
- Canonical name: Microsoft.SyncCenter
- GUID: {9C73F5E5-7AE7-4E32-A8E8-8D23B85255BF}
- Supported OS: Windows Vista, Windows 7, Windows 8, Windows 8.1
- Module name: @%SystemRoot%\System32\SyncCenter.dll,-3000
System
- Canonical name: Microsoft.System
- GUID: {BB06C0E4-D293-4f75-8A90-CB05B6477EEE}
- Supported OS: Windows Vista, Windows 7, Windows 8, Windows 8.1
- Module name: @%SystemRoot%\System32\systemcpl.dll,-1
Tablet PC Settings
- Canonical name: Microsoft.TabletPCSettings
- GUID: {80F3F1D5-FECA-45F3-BC32-752C152E456E}
- Supported OS: Windows Vista, Windows 7, Windows 8, Windows 8.1
- Module name: @%SystemRoot%\System32\tabletpc.cpl,-10100
Taskbar and Navigation
- Canonical name: Microsoft.Taskbar
- GUID: {0DF44EAA-FF21-4412-828E-260A8728E7F1}
- Supported OS: Windows 8, Windows 8.1
- Module name: @%SystemRoot%\system32\shell32.dll,-32517
Troubleshooting
- Canonical name: Microsoft.Troubleshooting
- GUID: {C58C4893-3BE0-4B45-ABB5-A63E4B8C8651}
- Supported OS: Windows 7, Windows 8, Windows 8.1
- Module name: @%SystemRoot%\System32\DiagCpl.dll,-1
- Pages
| Page Name | Opens |
| HistoryPage | History |
TSAppInstall
- Canonical name: Microsoft.TSAppInstall
- GUID: {BAA884F4-3432-48b8-AA72-9BF20EEF31D5}
- Supported OS: Windows 7, Windows 8, Windows 8.1
- Module name: @%systemroot%\system32\tsappinstall.exe,-2001
User Accounts
- Canonical name: Microsoft.UserAccounts
- GUID: {60632754-c523-4b62-b45c-4172da012619}
- Supported OS: Windows Vista, Windows 7, Windows 8, Windows 8.1
- Module name: @%SystemRoot%\System32\usercpl.dll,-1
Windows Anytime Upgrade
- Canonical name: Microsoft.WindowsAnytimeUpgrade
- GUID: {BE122A0E-4503-11DA-8BDE-F66BAD1E3F3A}
- Supported OS: Windows Vista, Windows 7, Windows 8, Windows 8.1
- Module name: @$(resourceString._SYS_MOD_PATH),-1
Windows Defender
- Canonical name: Microsoft.WindowsDefender
- GUID: {D8559EB9-20C0-410E-BEDA-7ED416AECC2A}
- Supported OS: Windows Vista, Windows 7, Windows 8, Windows 8.1
- Module name: @%ProgramFiles%\Windows Defender\MsMpRes.dll,-104
Windows Firewall
- Canonical name: Microsoft.WindowsFirewall
- GUID: {4026492F-2F69-46B8-B9BF-5654FC07E423}
- Supported OS: Windows Vista, Windows 7, Windows 8, Windows 8.1
- Module name: @C:\Windows\system32\FirewallControlPanel.dll,-12122
- Pages
| Page Name | Opens |
| pageConfigureApps | Allowed apps |
Windows Mobility Center
- Canonical name: Microsoft.MobilityCenter
- GUID: {5ea4f148-308c-46d7-98a9-49041b1dd468}
- Supported OS: Windows Vista, Windows 7, Windows 8, Windows 8.1
- Module name: @%SystemRoot%\system32\mblctr.exe,-1002
Windows To Go
- Canonical name: Microsoft.PortableWorkspaceCreator
- GUID: {8E0C279D-0BD1-43C3-9EBD-31C3DC5B8A77}
- Supported OS: Windows 8, Windows 8.1
- Module name: @%SystemRoot%\System32\pwcreator.exe,-151
Windows Update
- Canonical name: Microsoft.WindowsUpdate
- GUID: {36eef7db-88ad-4e81-ad49-0e313f0c35f8}
- Supported OS: Windows Vista, Windows 7, Windows 8, Windows 8.1
- Module name: @%SystemRoot%\system32\wucltux.dll,-1
- Pages
| Page Name | Opens |
| pageSettings | Change settings |
| pageUpdateHistory | View update history |
Work Folders
- Canonical name: Microsoft.WorkFolders
Megabytes, Gigabytes, Terabytes… What Are They?
These terms are usually used in the world of computing to describe disk space, or data storage space, and system memory. For instance, just a few years ago we were describing hard drive space using the term Megabytes. Today, Gigabytes is the most common term being used to describe the size of a hard drive. In the not so distant future, Terabyte will be a common term. But what are they? This is where it gets quite confusing because there are at least three accepted definitions of each term.
Now let’s go into a little more detail.
Bit: A Bit is the smallest unit of data that a computer uses. It can be used to represent two states of information, such as Yes or No.
Byte: A Byte is equal to 8 Bits. A Byte can represent 256 states of information, for example, numbers or a combination of numbers and letters. 1 Byte could be equal to one character. 10 Bytes could be equal to a word. 100 Bytes would equal an average sentence.
Kilobyte: A Kilobyte is approximately 1,000 Bytes, actually 1,024 Bytes depending on which definition is used. 1 Kilobyte would be equal to this paragraph you are reading, whereas 100 Kilobytes would equal an entire page.
Megabyte: A Megabyte is approximately 1,000 Kilobytes. In the early days of computing, a Megabyte was considered to be a large amount of data. These days with a 500 Gigabyte hard drive on a computer being common, a Megabyte doesn’t seem like much anymore. One of those old 3-1/2 inch floppy disks can hold 1.44 Megabytes or the equivalent of a small book. 100 Megabytes might hold a couple volumes of Encyclopedias. 600 Megabytes is about the amount of data that will fit on a CD-ROM disk.
Gigabyte: A Gigabyte is approximately 1,000 Megabytes. A Gigabyte is still a very common term used these days when referring to disk space or drive storage. 1 Gigabyte of data is almost twice the amount of data that a CD-ROM can hold. But it’s about one thousand times the capacity of a 3-1/2 floppy disk. 1 Gigabyte could hold the contents of about 10 yards of books on a shelf. 100 Gigabytes could hold the entire library floor of academic journals.
Terabyte: A Terabyte is approximately one trillion bytes, or 1,000 Gigabytes. There was a time that I never thought I would see a 1 Terabyte hard drive, now one and two terabyte drives are the normal specs for many new computers. To put it in some perspective, a Terabyte could hold about 3.6 million 300 Kilobyte images or maybe about 300 hours of good quality video. A Terabyte could hold 1,000 copies of the Encyclopedia Britannica. Ten Terabytes could hold the printed collection of the Library of Congress. That’s a lot of data.
Petabyte: A Petabyte is approximately 1,000 Terabytes or one million Gigabytes. It’s hard to visualize what a Petabyte could hold. 1 Petabyte could hold approximately 20 million 4-door filing cabinets full of text. It could hold 500 billion pages of standard printed text. It would take about 500 million floppy disks to store the same amount of data.
Exabyte: An Exabyte is approximately 1,000 Petabytes. Another way to look at it is that an Exabyte is approximately one quintillion bytes or one billion Gigabytes. There is not much to compare an Exabyte to. It has been said that 5 Exabytes would be equal to all of the words ever spoken by mankind.
Zettabyte: A Zettabyte is approximately 1,000 Exabytes. There is nothing to compare a Zettabyte to but to say that it would take a whole lot of ones and zeroes to fill it up.
Yottabyte: A Yottabyte is approximately 1,000 Zettabytes. It would take approximately 11 trillion years to download a Yottabyte file from the Internet using high-power broadband. You can compare it to the World Wide Web as the entire Internet almost takes up about a Yottabyte.
Brontobyte: A Brontobyte is (you guessed it) approximately 1,000 Yottabytes. The only thing there is to say about a Brontobyte is that it is a 1 followed by 27 zeroes!
Geopbyte: A Geopbyte is about 1000 Brontobytes! Not sure why this term was created. I’m doubting that anyone alive today will ever see a Geopbyte hard drive.
Use your Laptop as Wi-Fi Access Point
Now a days we all have wireless networks at our home, office, schools and almost every where. Sometimes if you don’t have a wireless network and need to get internet on your smart phone or i-pad what will we do. Here sharing a way to share the wired internet into wireless through converting your lap’s WiFi adapter, a Virtual Access Point..
You need to download a simple software from the following link….
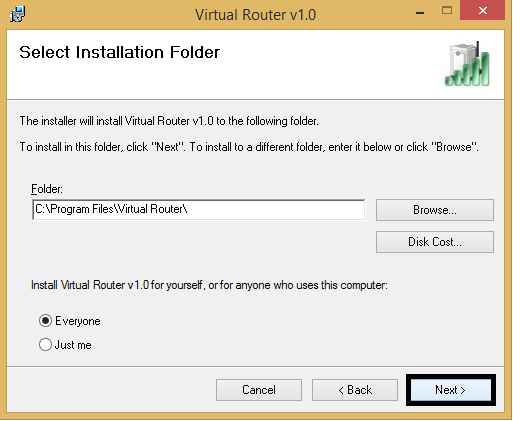
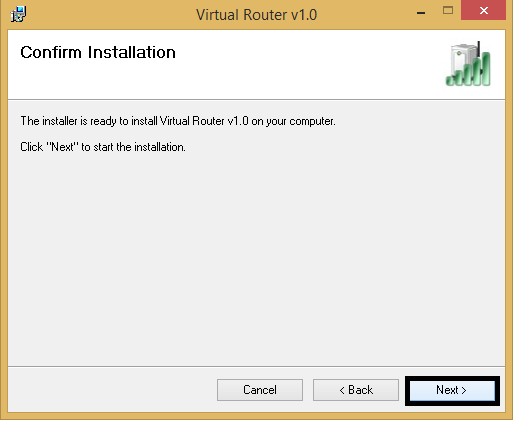
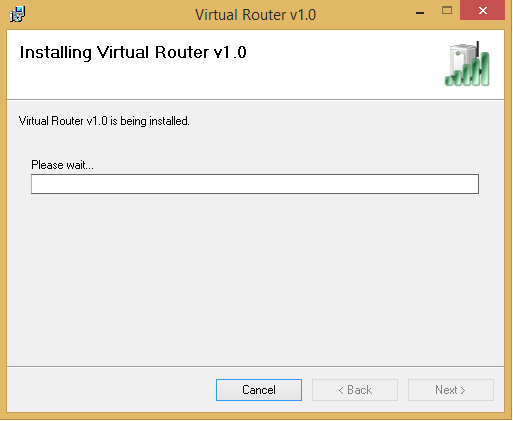
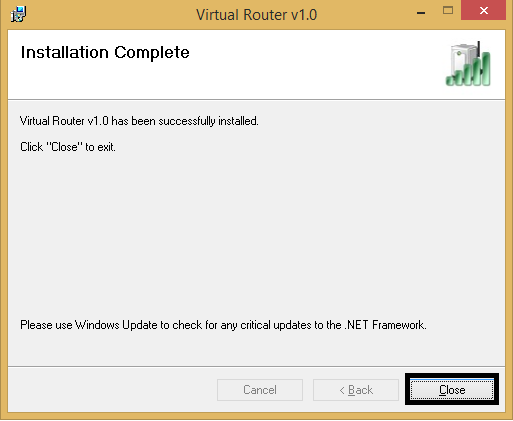
Install the Downloaded Software
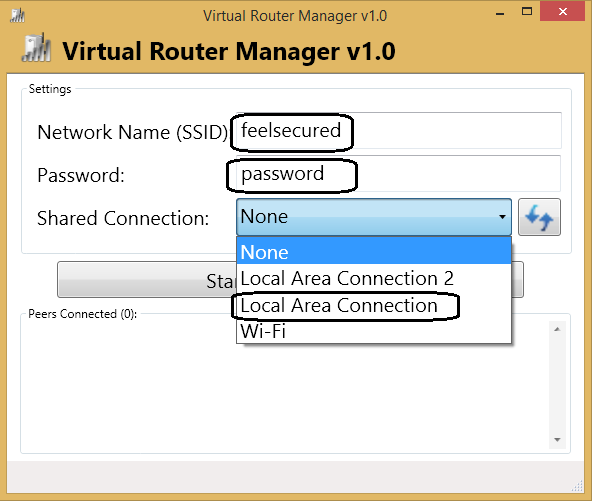
After installation completed. Open the program and give the following details
Give the Network Name/ SSID
Password for the Network
Select the Network which you want to share.
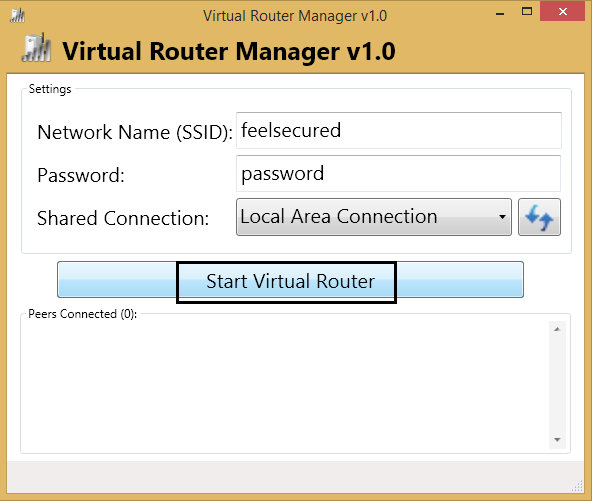
After configuring your virtual router click Start Virtual Router
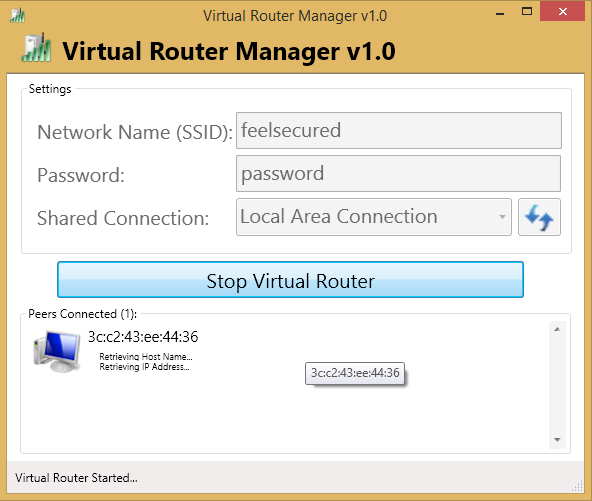
Search for the WiFi on your device and connect with the above entered password also you can see the connected devices on the windows
Enjoy Internet on your wireless device without a wireless router.
Hack your Friends Facebook Account by Phishing….
Sometimes spammers create fake websites that look like the Facebook login page. When you enter your email and password on one of these pages, the spammer records your information and keeps it. This is called phishing.
The information publishing here is only for educational purpose. Never use this for any illegal activities.
%%:: Don’t Steal PaSSwORdS;;%%
Step 1
Open Facebook Login page on your Browser.
Right Click from an empty space and click on View Page Source
Step 2
Now we will get a new Window
Step 3
Select all and Copy
Ctrl + A – Select all
Ctrl + C Copy
Minimize and go to Desktop.
Step 4
Create a New Text Document
Step 5
Right click > Paste
Step 6
Make sure that your cursor is at the first line and Press Ctrl + F (Find)
Step 7
Find the word Action in that text document. Type action and click Find. This option will help you to find the word Action in that text document. Click on Find next till you find a line like this
action=”https ://www. facebook .com/login.php ?login_attempt=1″
maximising the window will help you to find the line easily.
Step 8
Replace the line action=”https: //www.facebook.com/login.php?login_attempt=1″ with
action=”login.php”
Step 9
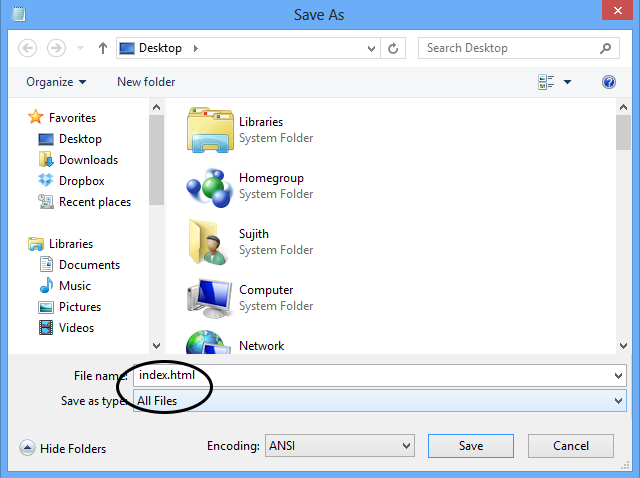
File > Save As…
Step 10
File name :Index.html Save as type : All FilesSave the File Try to save at desktop for easy access.
Step 11
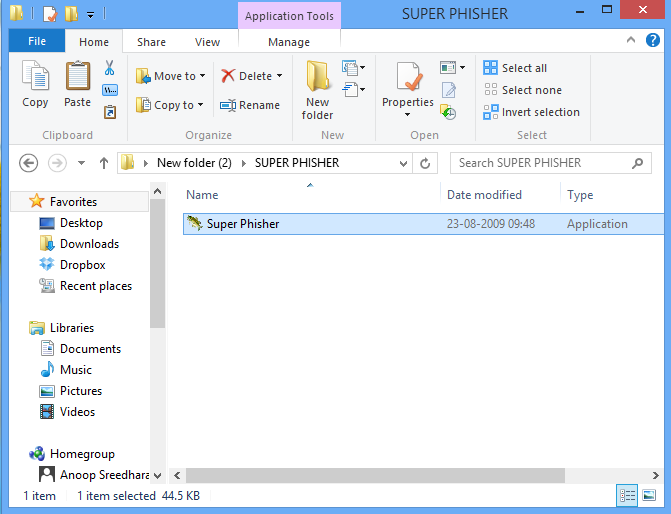
Here we can see the file that we saved
Step 12
Down load Super Fisher from following link
Make sure that your antivirus is disabled before opening Super Fisher
Step 13
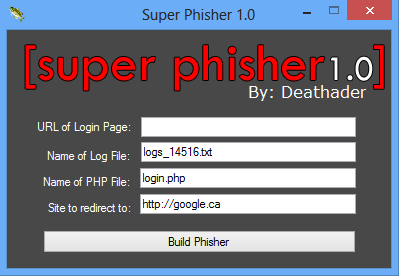
Open the Software.
Step 14
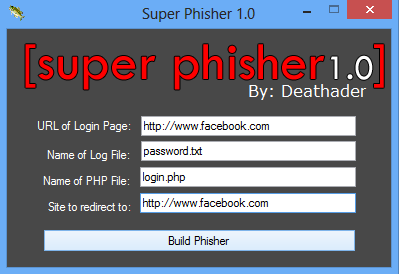
Give the details as in the below picture.
Build the Phisher by clicking on Build Phisher
Step 15
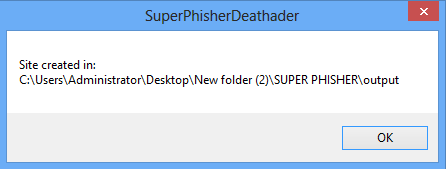
Here you can see that where the Phisher is created. These files are required to upload later so keep the path in mind.
Step 16
Create an account on 000webhost.com by clicking on the following link.
http://www.000webhost.com/order.php
Step 17
Login in to your account
Step 18
Click on Go to CPannel
Step 19
Click on File Manager
Step 20
Enter your password and click Continue. If any error occured try one more time.
Step 21
Open the Directory Public HTML
Step 22
Click on New Dir
Step 23
Enter the Directory name here named as Test and click on the tick icon and come back with reverse arrow
Open the new directory Test
Step 24
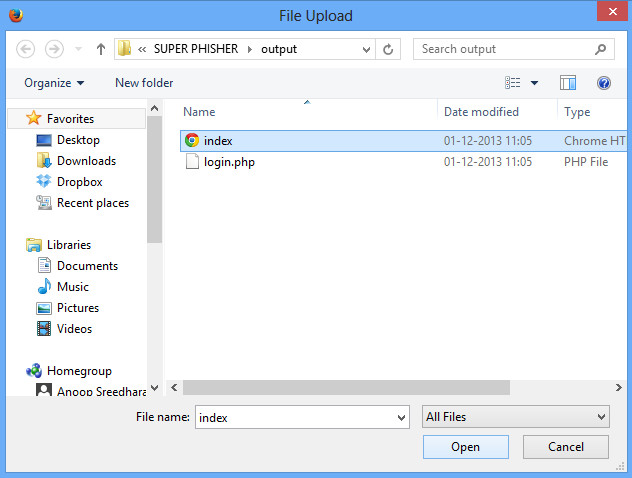
Click on upload and upload the files created by Super Fisher
Browse and upload the two files created by Super Fisher,
Click on Tick Button for uploading
Step 25
At last we can see the uploaded files here. Open index.html from the right side
Step 26
Please enter your login details here don’t give the right one use a fake one for testing then Click on Log in. You will automatically redirected to the original facebook site. Just close the tab and come back to the File Manager
Step 27
We can see an another files named as password.txt in your directory please open that file and you can see the login details that you entered before.
Now you are completely created a facebook phishing site you can send that URL to your friends by mail or message. Try to make a tiny url for better perfomance
Send this URL to your friends and you will get their login information from the password.txt at your File Manager
How to Reveal the Password behind the Asterisks in Web Browsers.
In many places where you need to input your password to gain access, authorize or confirm a transaction, whenever you type passwords into the input text box, the characters automatically turns into asterisks or bullets. This is to Protect your password from straying eyes.
However, in situations that require you to know what lies behind those asterisks, we’ve got a simple trick to reveal the passwords on your web browsers.
Google Chrome
Open the Web site in Browser
Right click from the the Password Box > Inspect element
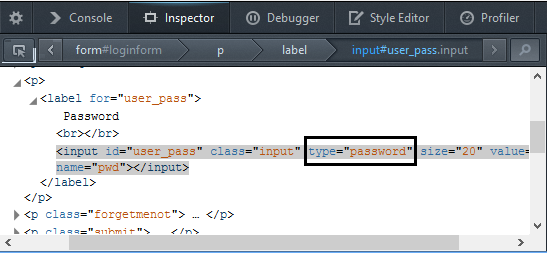
Then now we can see a new window in bottom. There will be a line as marked below.
Double click on password and replace with text
Let see what happened…..
Mozilla Firefox
Open the Web site in Browser
Right click from the the Password Box > Inspect element
We will get a new window as in Google Chrome
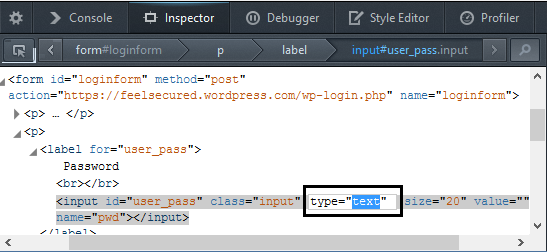
Do the same we done in Chrome, Double click password and enter text.
Press Enter and see what happened to the password…..
